User Guide and Manual for the Social Platform Doctrinum

Index
Please Note: When the guide was written, our social media platform was still in the process of its "fine-tuning".
Consequently, slight differences may apply between the "fine-tune" stage and the final stage of our social media platform.
Moreover, in the pictures you will see names appearing like "Ancient Greece" or "Doctrinum". Point is, that once the social media platform officially launches the name (at the top left corner) may be different than the one the you will see in the current user guide.
Registration and Login
The Main Panel
The Profile Page
Your Settings
Writing and Publishing a Post (and friend request)
Adding Comments and Liking a Post
Album Panel
Creating a New Page or Pages
Creating Your Own Blog and Adding Posts
Chat, Private Messages, Invites and Private Conference
Hashtags
How to get your Credits
Advertising and Promoting yourself and your work
Promoting a Post
Become Verified
The Notification Panel
Change the Language
Names solely reserved for the Team
Newsletter
Deleting your Account
Read Also
Main Links of Ancient Greece Reloaded
Registration and Login
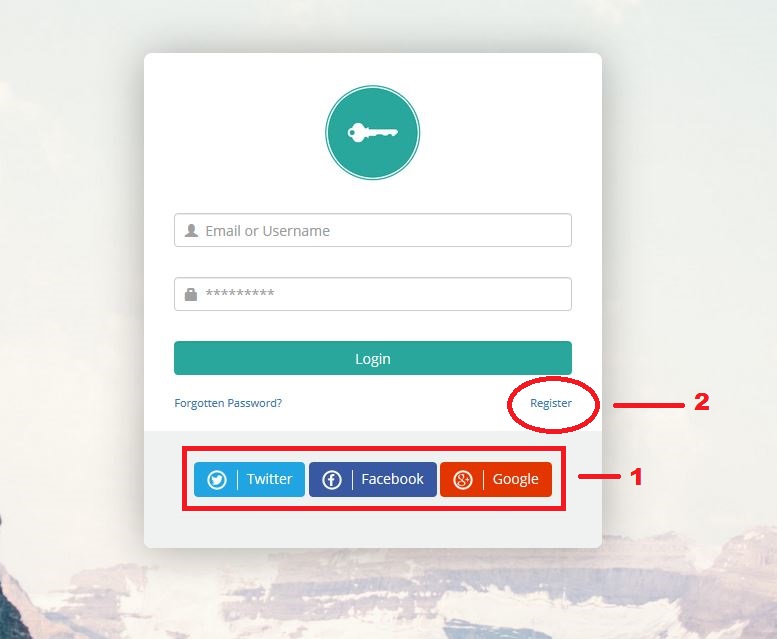
If this is your first time visiting our social media platform, the first thing that you will come across is the login and the registration page.
If you are already a member, just login by using your email (or your username) and your password.
If you want to register and to use the social media platform of Ancient Greece Reloaded you have two options available to you.
Option 1:
Register through your Twitter account, your Facebook account or your Google+ account.
Choose whichever of your accounts you prefer, click on one of them and complete the process.
Afterwards, you will be asked to select a username and to set your password for the social media platform.
Please Note:
We use a very different system that other social media platforms do, in terms of registry.
What we want to say is this:
The username acts as a unique identifier for your account (currently, the only way to change it is through the Admin – thus, choose your username carefully).
Also, what others will see – as well as if you want to search for a member by utilizing the search option – it is performed through the "First Name" and "Last Name" fields (which you can change through your settings at any time).
Finally, Validation is only allowed for (existing) individuals, companies, businesses, organizations etc.
For example:
Let us say that initially you have chosen (as the first name and the last name),
the name: Albert Einstein;
and as a username you are using: Goku
Consequently, members will be able to search and to find you through the name of Albert Einstein.
Now, let us say that you have decided to become validated so as to promote your own work.
Obviously, Albert Einstein is dead. Thus, you will have to go to your settings, change the "First Name" and "Last Name" fields accordingly to your actual name, and then initiate the validation process.
Option 2:
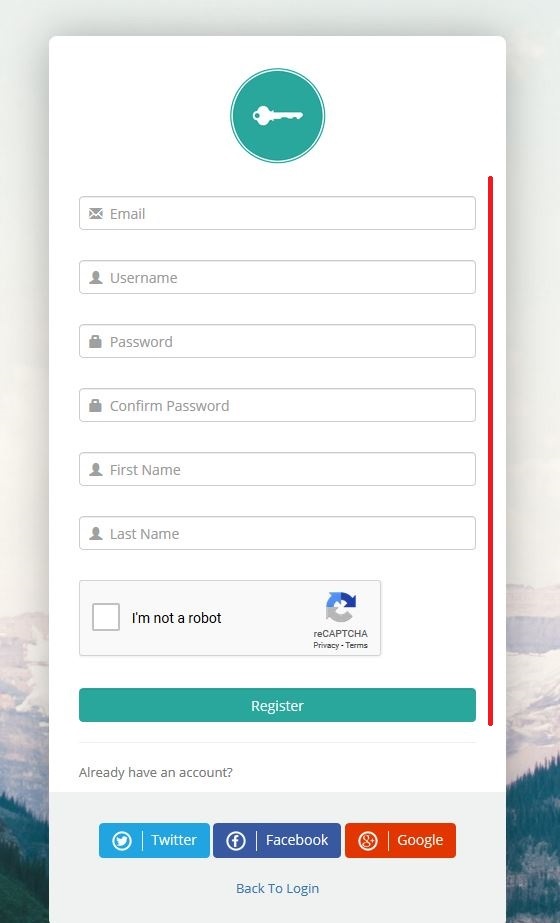
If you so prefer, instead of Option 1, you can use the typical way to register your account.
Just fill out the fields (as seen in the picture below) and complete the registration process
Finally, once the registration process has been completed (as seen in the following picture), you will be asked to go to your email and to click on the activation link that will be send to you.
If necessary, check your spam or junk folders.
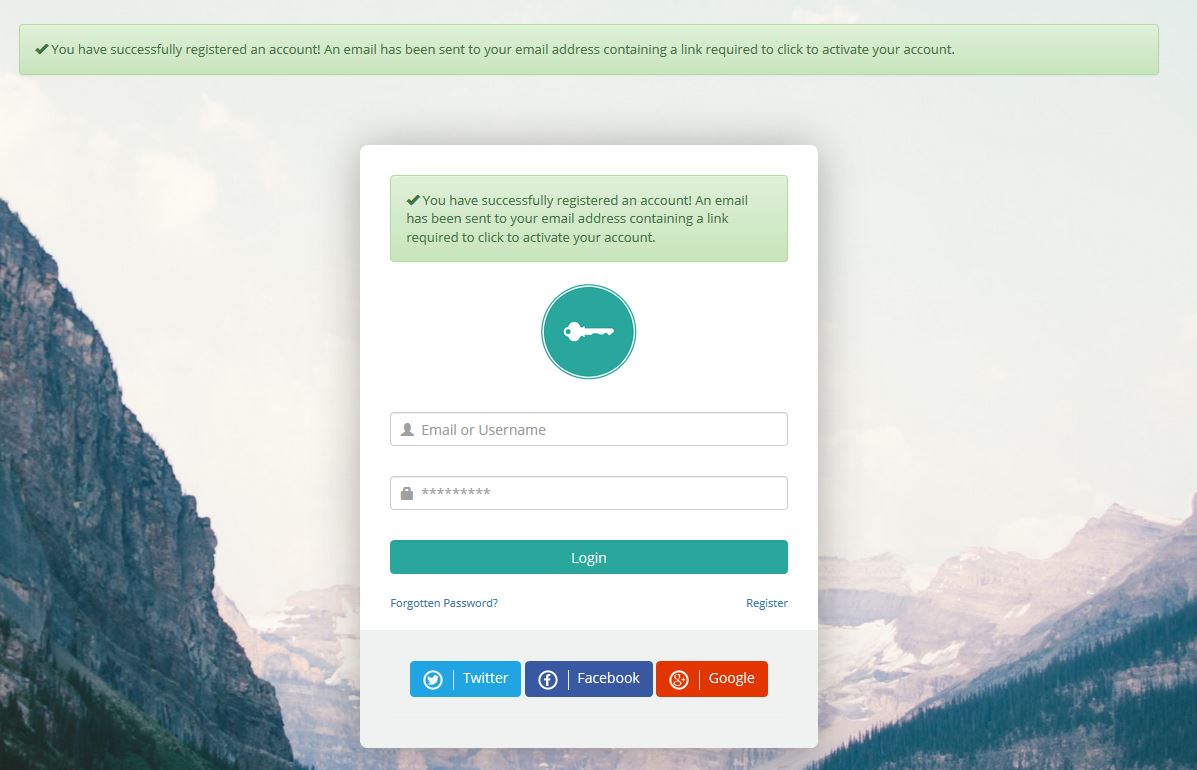
You are done, and... Welcome to the Social Media Platform of Ancient Greece Reloaded.
The Main Panel
Once you have successfully logged into the social media platform, the main panel will open up to you.
At the main panel, you will have a plethora of tools at your disposal.
Moreover, we focused to keep the design clean and as user-friendly as it can get.
So, let us take a look at what tools are available to you.
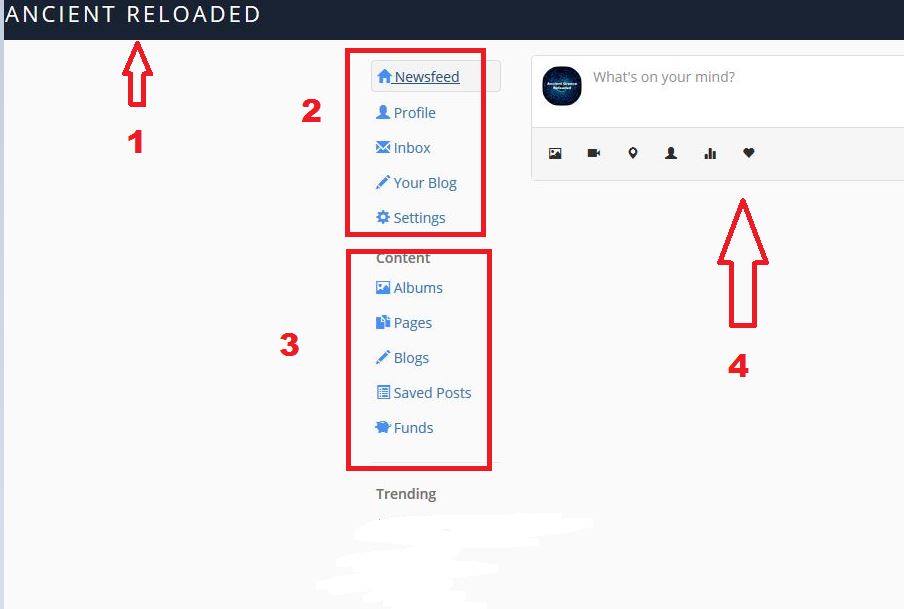
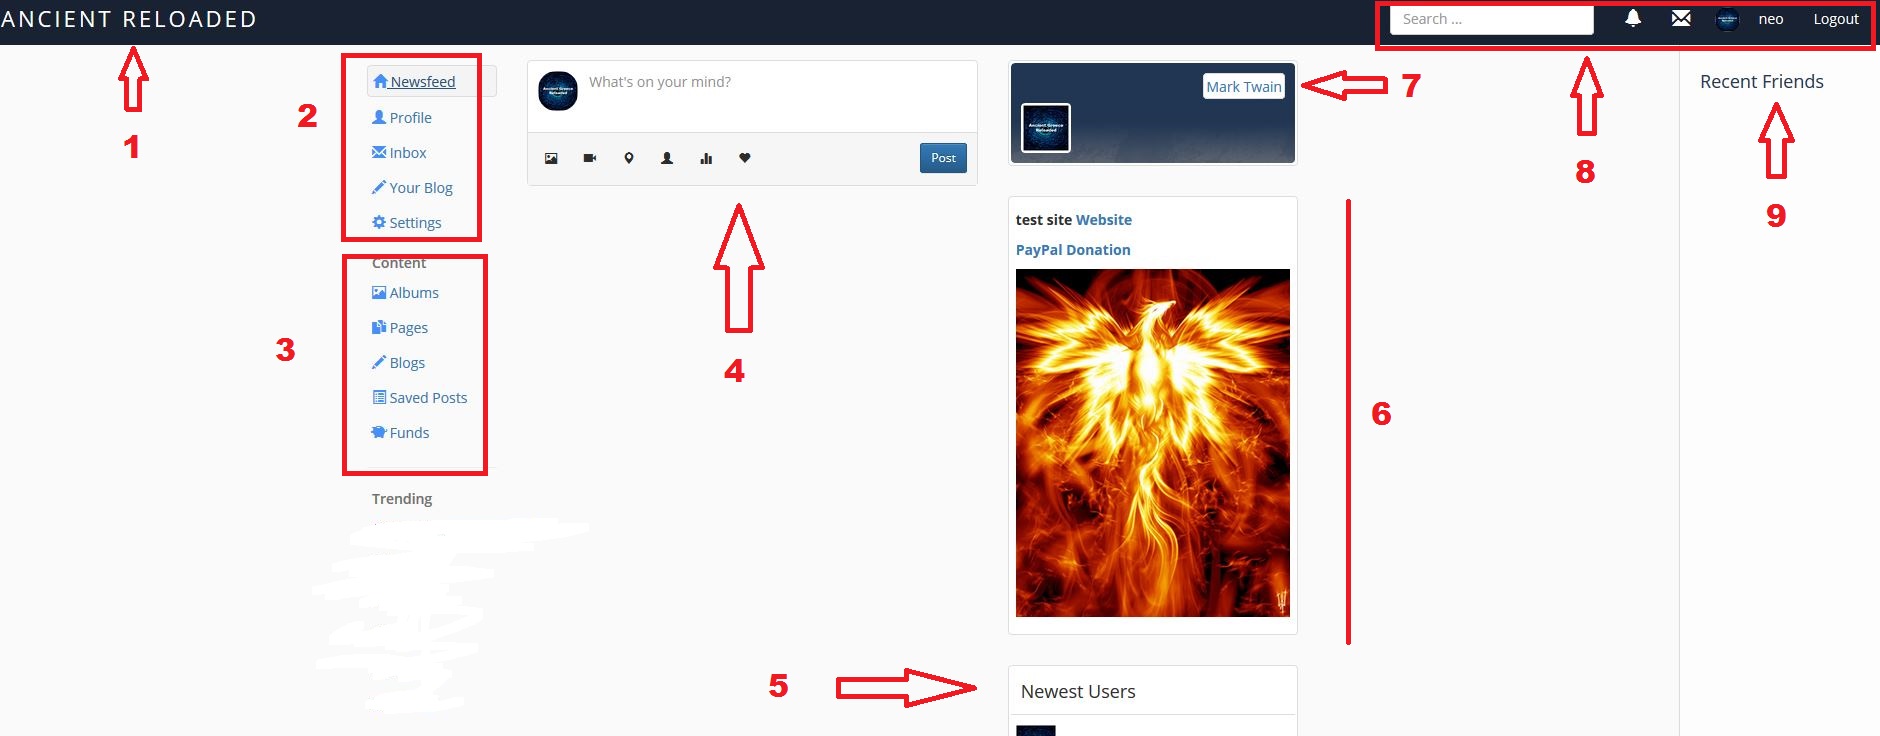
1.
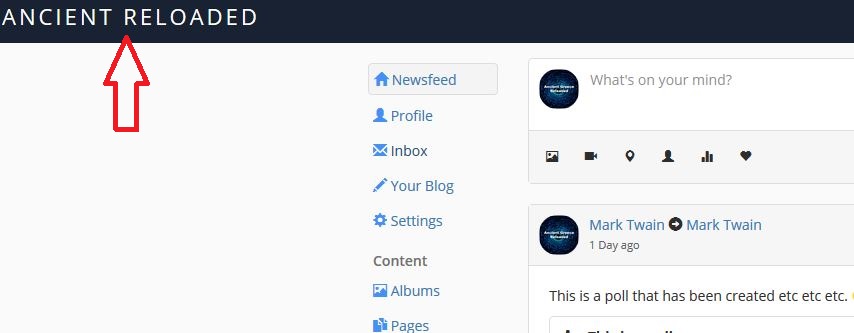
Wherever you may find yourself inside the social media platform, if you click at the name (aka, the upper left corner) you will go to the main panel; think of it something like the "Home button".
2.
Newsfeed: Opens up the posts of your friends and their latest news.
Profile: Opens your own (aka, profile) main page.
Inbox: Opens your messages as well as the options to, a) perform live chats and b) to perform a conference chat with a number of friends (through the invite option).
Your Blog: Opens up your Blog page.
Settings: Opens the settings option for your profile page etc.
3.
Albums: Opens your Album page
Pages: Opens the index of your own pages in which you can create a new page, customize your existing pages etc.
Blogs: Opens the existing Blog(s) section; not necessarily limited to your friends’ blogs.
Saved Posts: Opens your post(s) index page.
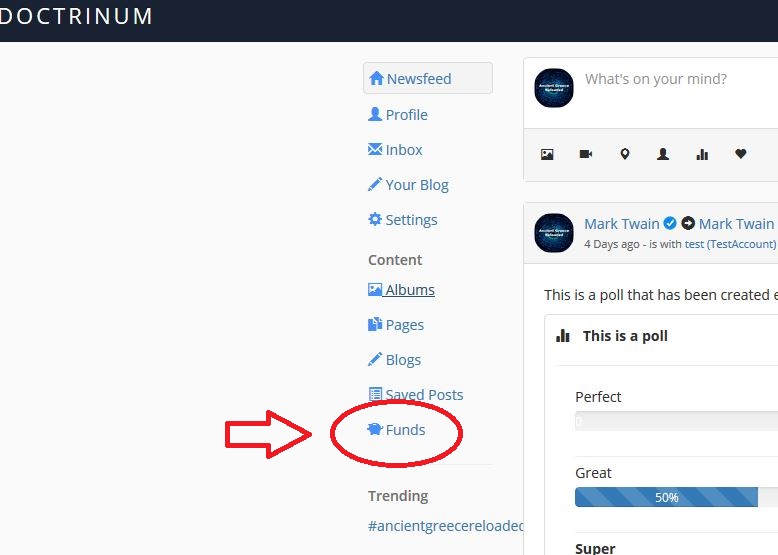
Funds: You can obtain funds/credits which you can use to initiate the Verification process or to promote your posts, to advertise your work, your company etc.
4.
The area where you can write and publish a post.
But also, the area in which your friends’ posts and newsfeed will be displayed.
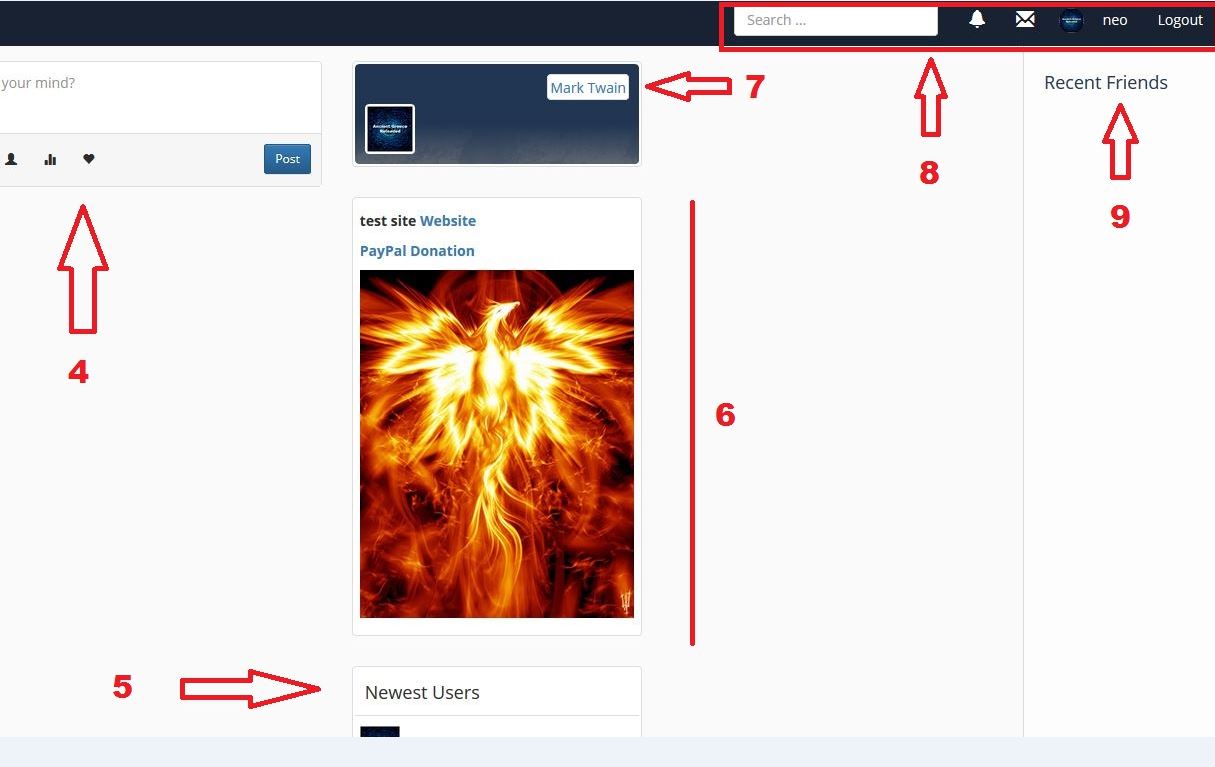
5.
Shows the newest members of our social media platform.
6.
The area in which advertisements will be displayed.
Please Notice: This will most likely be the only area, in the main panel, in which advertisements will be displayed.
The reason?
So as to avoid advertisements to be intrusive and to affect user experience.
7.
By clicking on your name, you can open your own main page.
8.
Search: the search bar in which you can search for members, pages and blogs.
Bell: When red, lets you know that something new has been posted by your friends etc.
Envelope: When red, you received a message.
Username: when clicking on your username, it will open the dropdown panel with the options of: My Profile, My Pages, Your Friends' list and The Settings.
Logout: By clicking on it you can log out from the social media platform.
9.
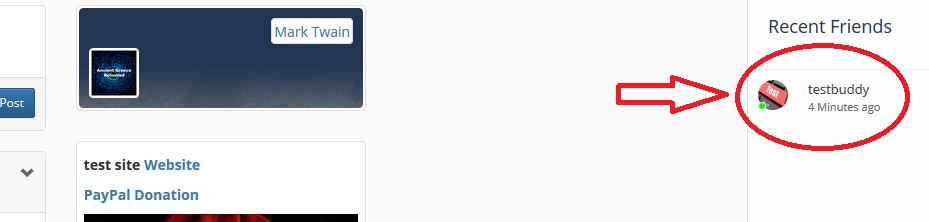
Displays your most recent friends.
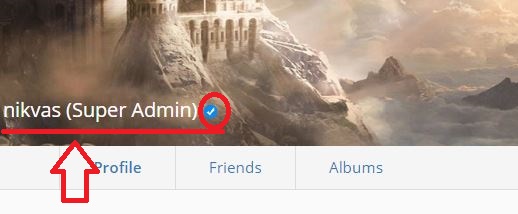
The Profile Page
In contrast to the main panel, the profile page focuses more on you rather than the entire social media platform.
All the functions of the horizontal bar at the top (1), as well as what Recent Friends (2) stand for, have been explain in the previous section.
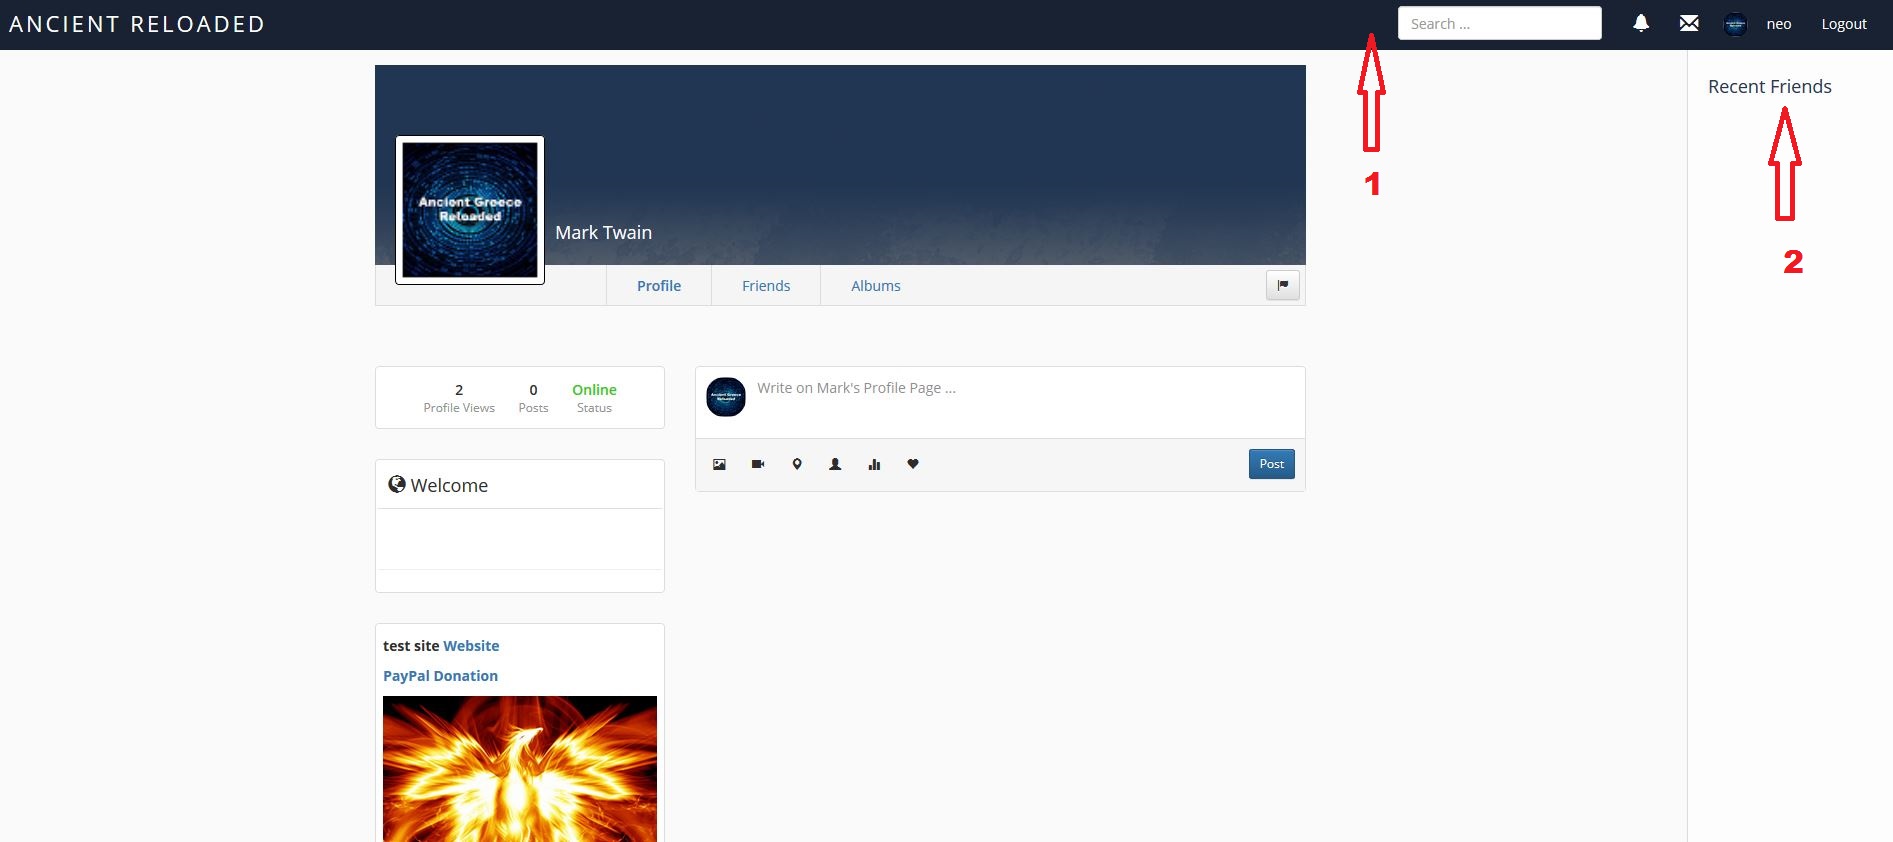
Thus, we will focus more on additional tools that are available to you.
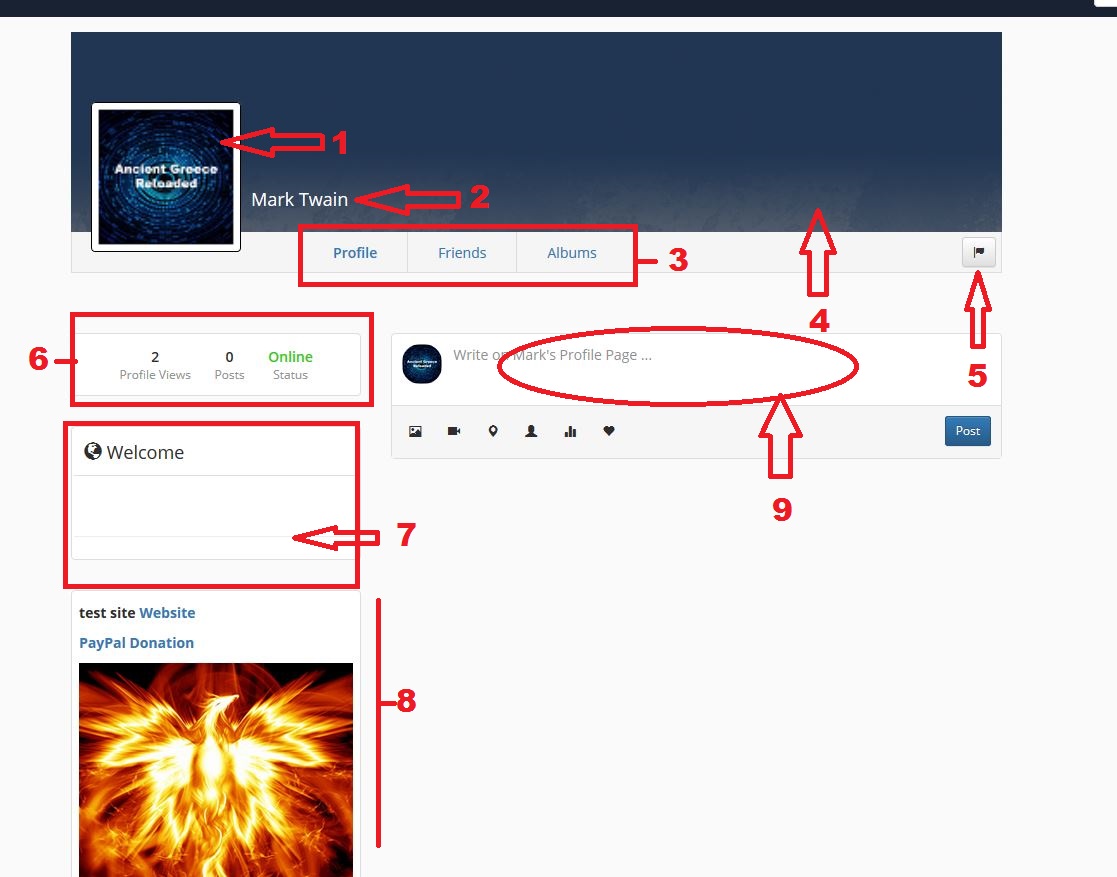
1. Your profile picture
2. Your name or nickname
3. Your Basic tools
Profile: Opens your own main profile page
Friends: Opens the list of your friends
Albums: Opens the list of your (picture) albums
4. Your background picture
5. Report a user to the Admin
6. Quick stats of your profile page or a user's profile page
Profile Views: How many views a member’s profile page has received so far (aka, how many visits)
Posts: The number of posts that the member has made so far
Status: Online or Offline
7. Welcome Board: Here you can write something about you, your business, or what your page is all about, as well as to add additional links to other platforms, websites and so forth.
8. Ads Area: In contrast to the main panel, in which the ads were displayed at the right side, in the profile page the ads are displayed at the left side.
Hence, a "minimalistic" approach has been adopted so as to not affect user experience.
9. Post Area: Here you can write and publish your own posts.
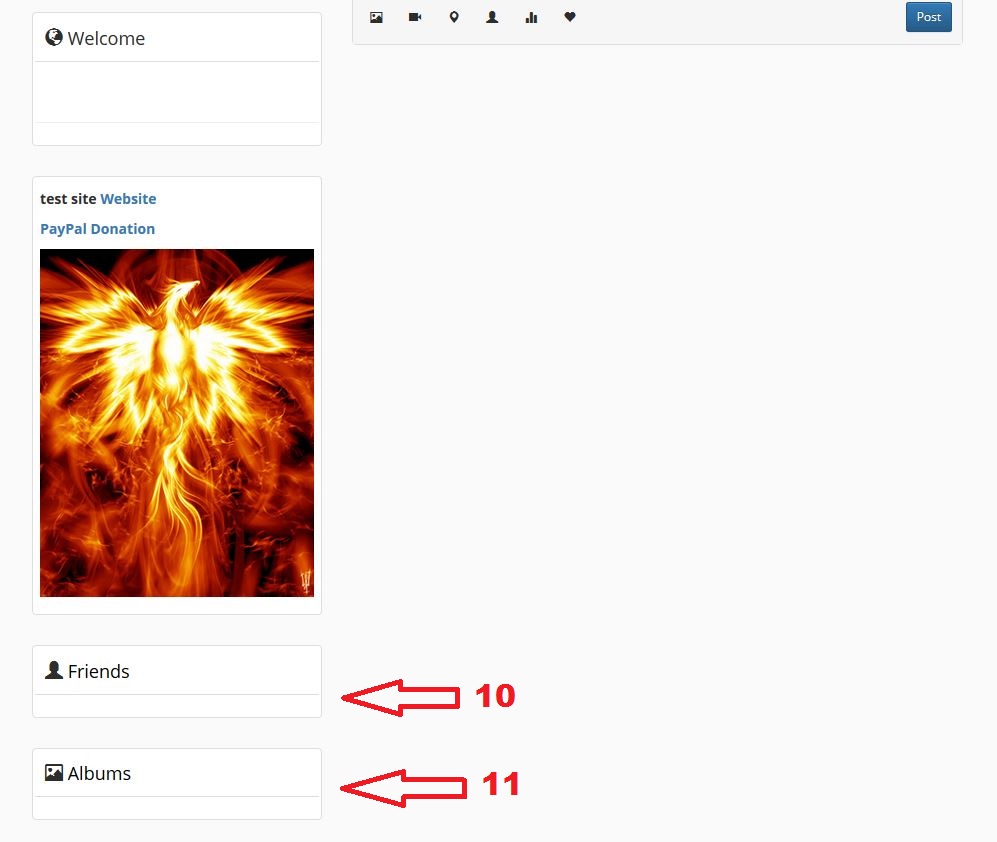
10. Displays your friends
11. Displays your Albums
Your Settings
When you click to go to your own settings – be it from the main panel or your own page – you will be guided to your Settings Panel.
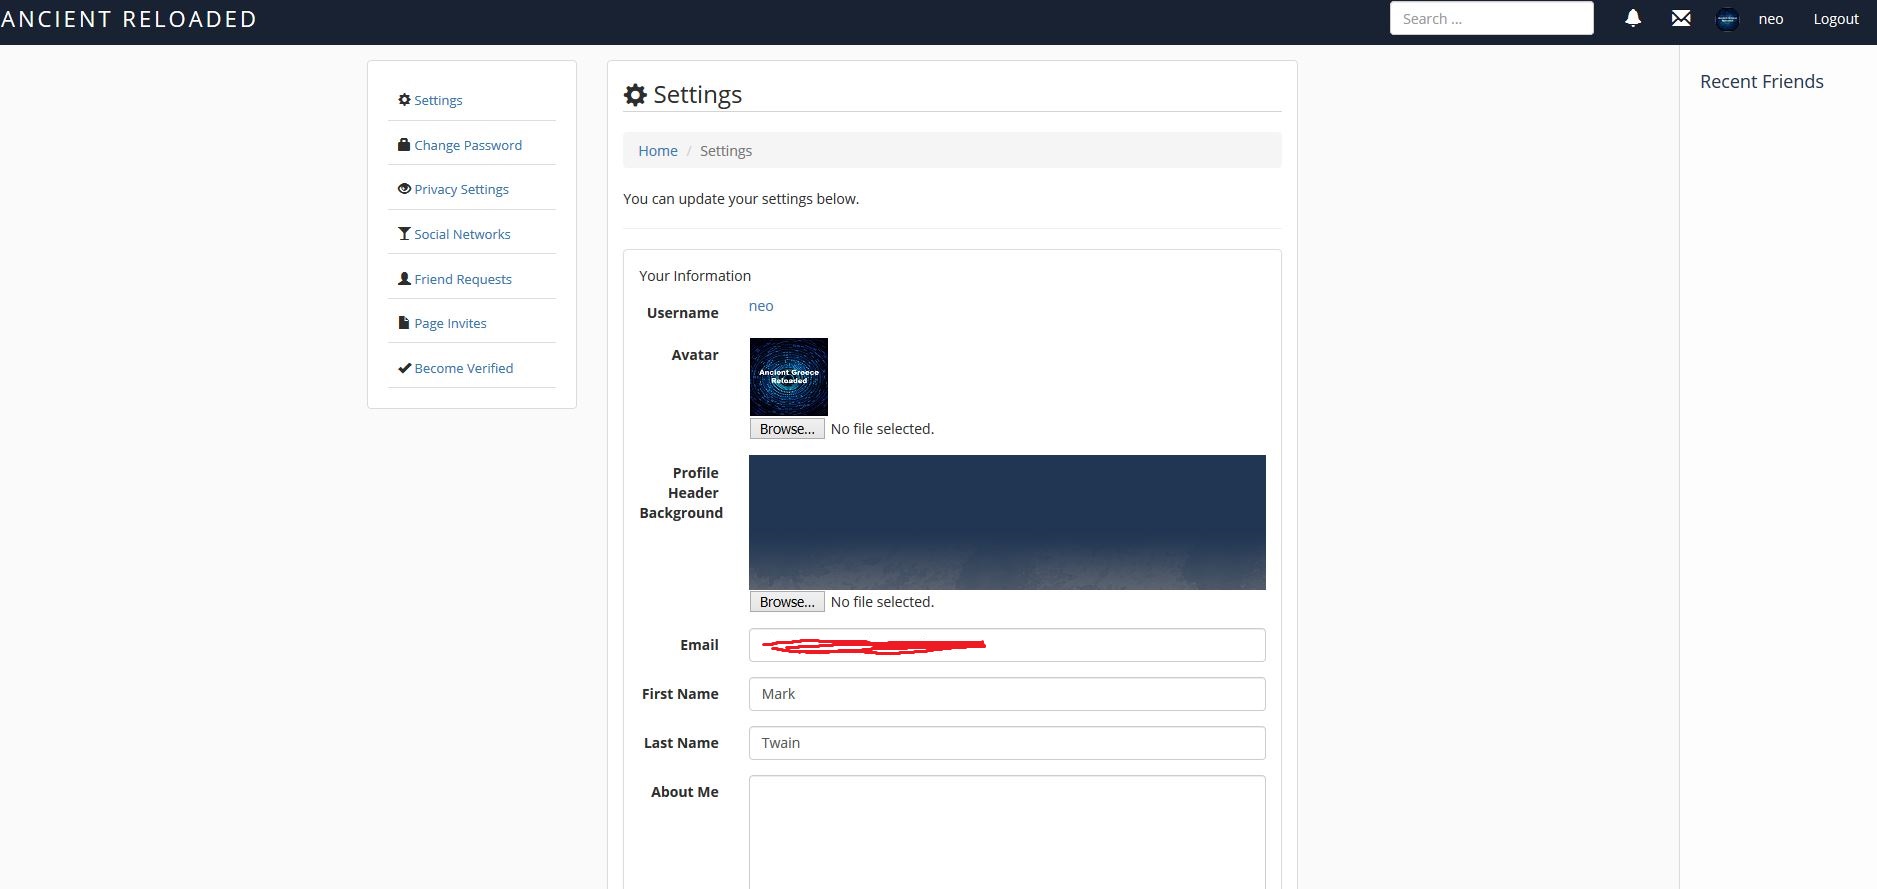
In more detail...
1. Take complete control of all of your settings.
Change Password: Here you can change your password
Privacy Settings: Opens up the page in which you can control everything in regards to your privacy, like: who can view your profile, who can message you, who can view your posts etc.
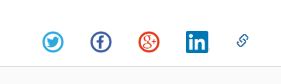
Social Networks: Here you can add additional external links in regards to you, such as: Your Facebook page, your LinkedIn Page, the URL to your own website etc.
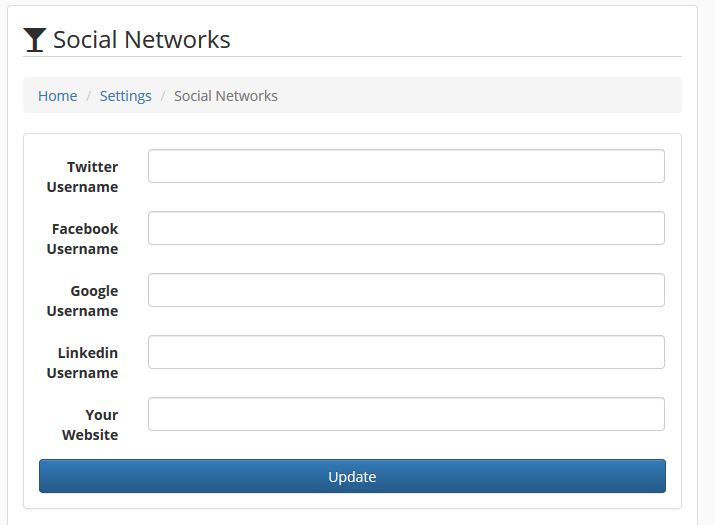
For Twitter:
https://twitter.com/username (copy-paste the username)
For Facebook:
https://www.facebook.com/username/ (copy-paste the username and the ending with a dash, aka / )
For GooglePlus:
https://plus.google.com/u/0/b/username/.... (copy-paste the username which in this case is a long number)
For LinkedIn:
Just copy-paste the entire URL
For Your Website:
Just copy-paste the entire URL
--------------
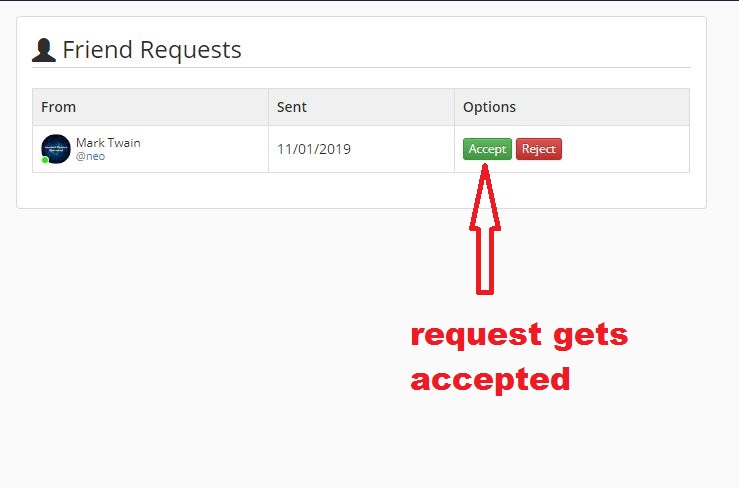
Friend Requests: Opens the list of friend requests
Page Invites: Opens the list of page invites
Become Verified: Initiates the Verification process (follow the given steps).
2. Change your Avatar (aka, profile picture).
Ideal dimensions: 200 pixels X 200 pixels and preferred format .jpg (alternatively .png). Currently, Max file size: 0.45 MB
3. Change your Background picture.
Ideal dimensions: 1920 px X 500 px and preferred format .jpg (alternatively .png). Currently, Max file size: 0.45 MB
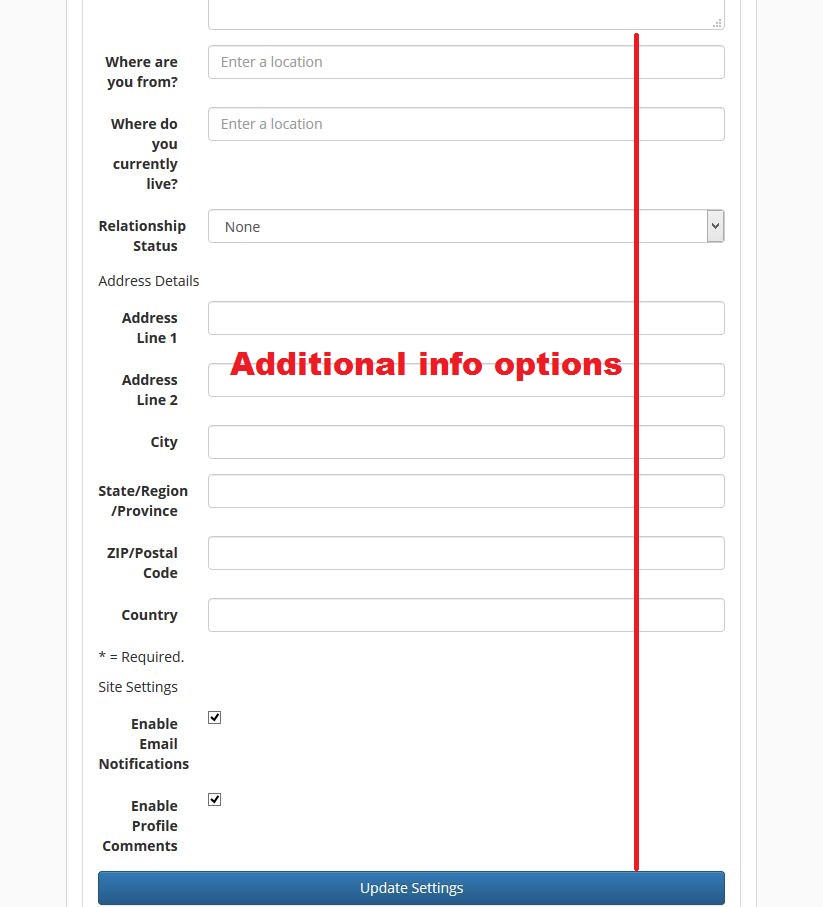
4. Here you can change your most basic info.
5. Say something about you.
Writing and Publishing a Post (and sending friend requests)
In this section we discuss how to write and how to publish a post; as well as, the options available to you.
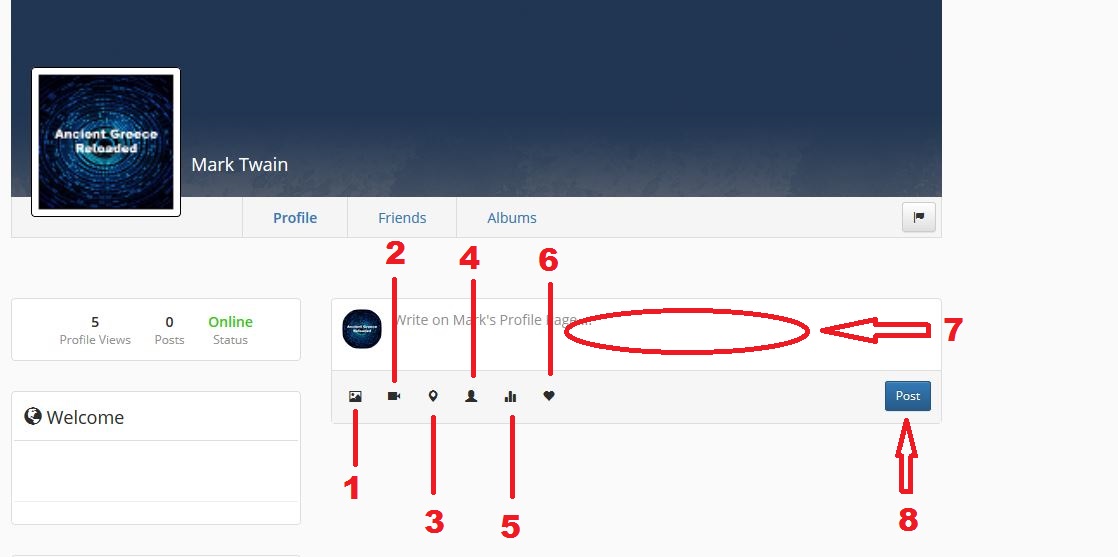
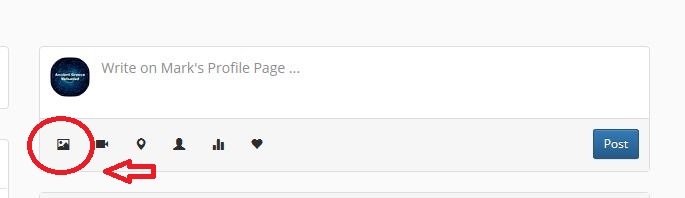
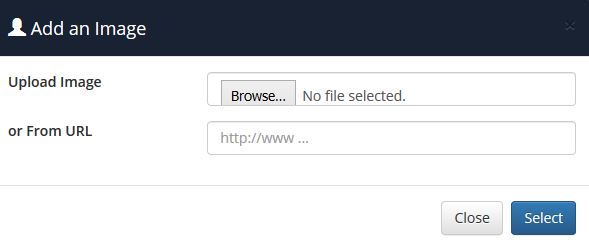
1. Adding a picture to your post (either by uploading it or by using the URL for it)
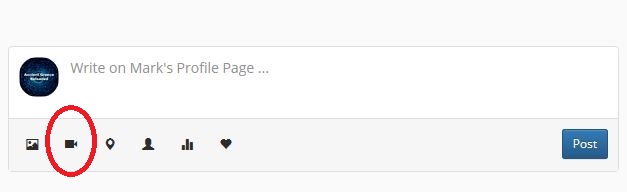
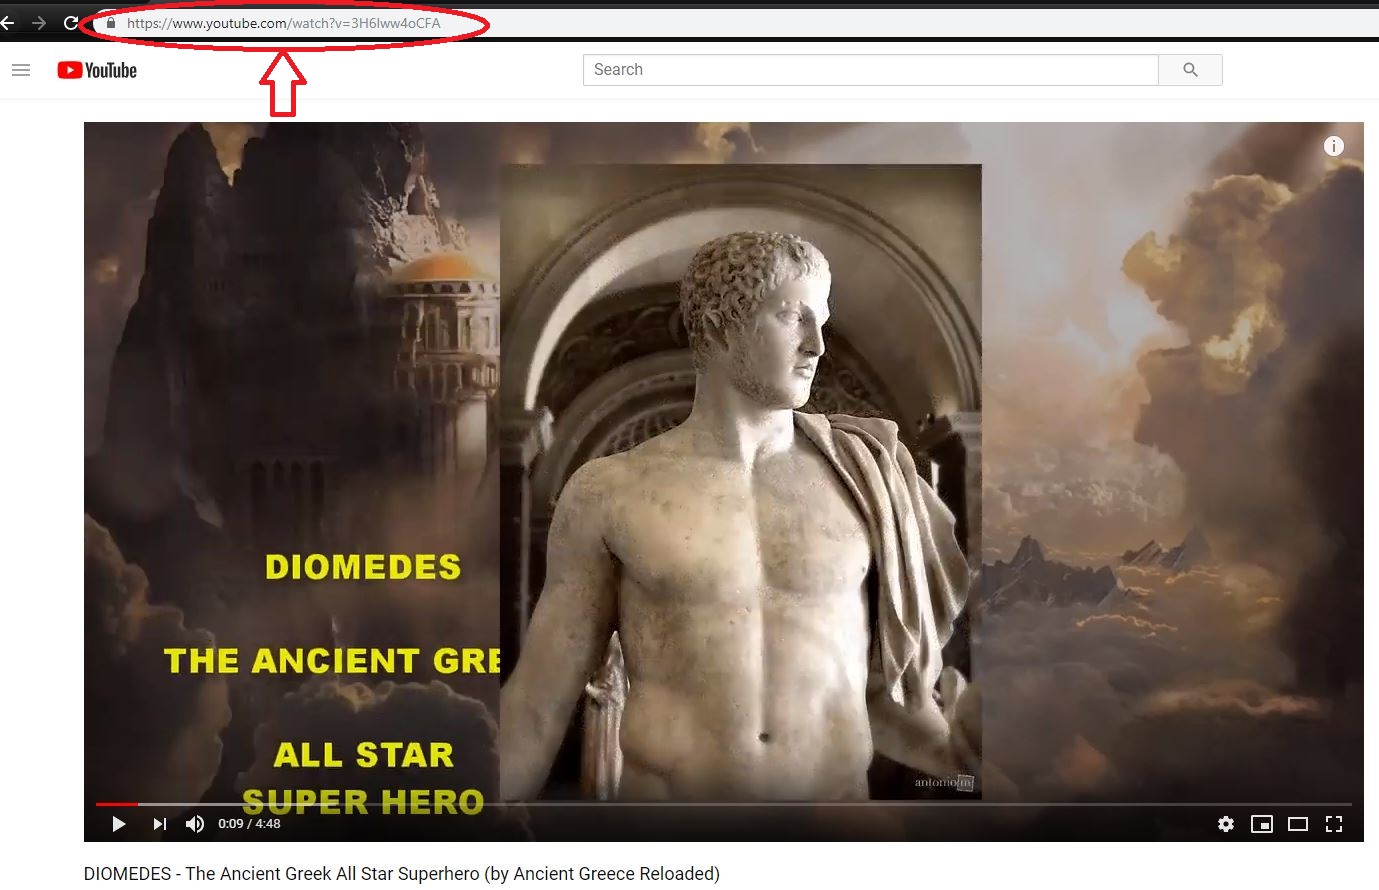
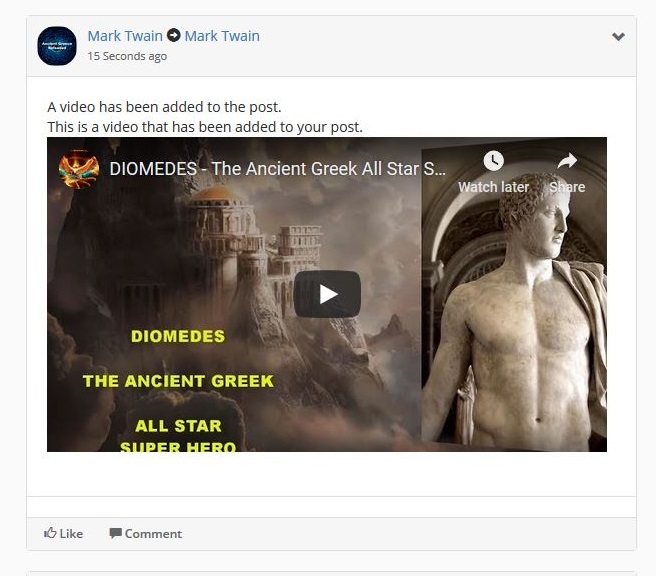
2. Adding a YouTube video to your post (either by uploading it or by using the URL for it). We suggest to use the URL to your YouTube video.
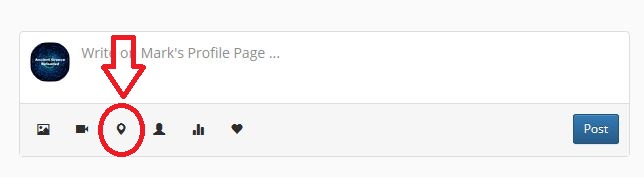
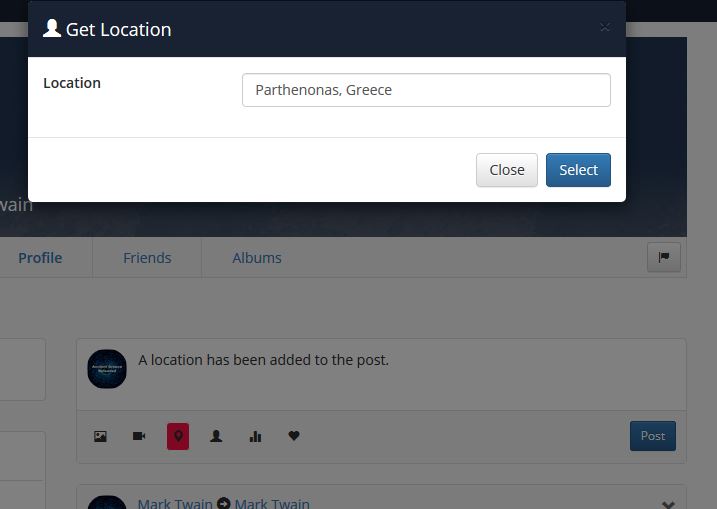
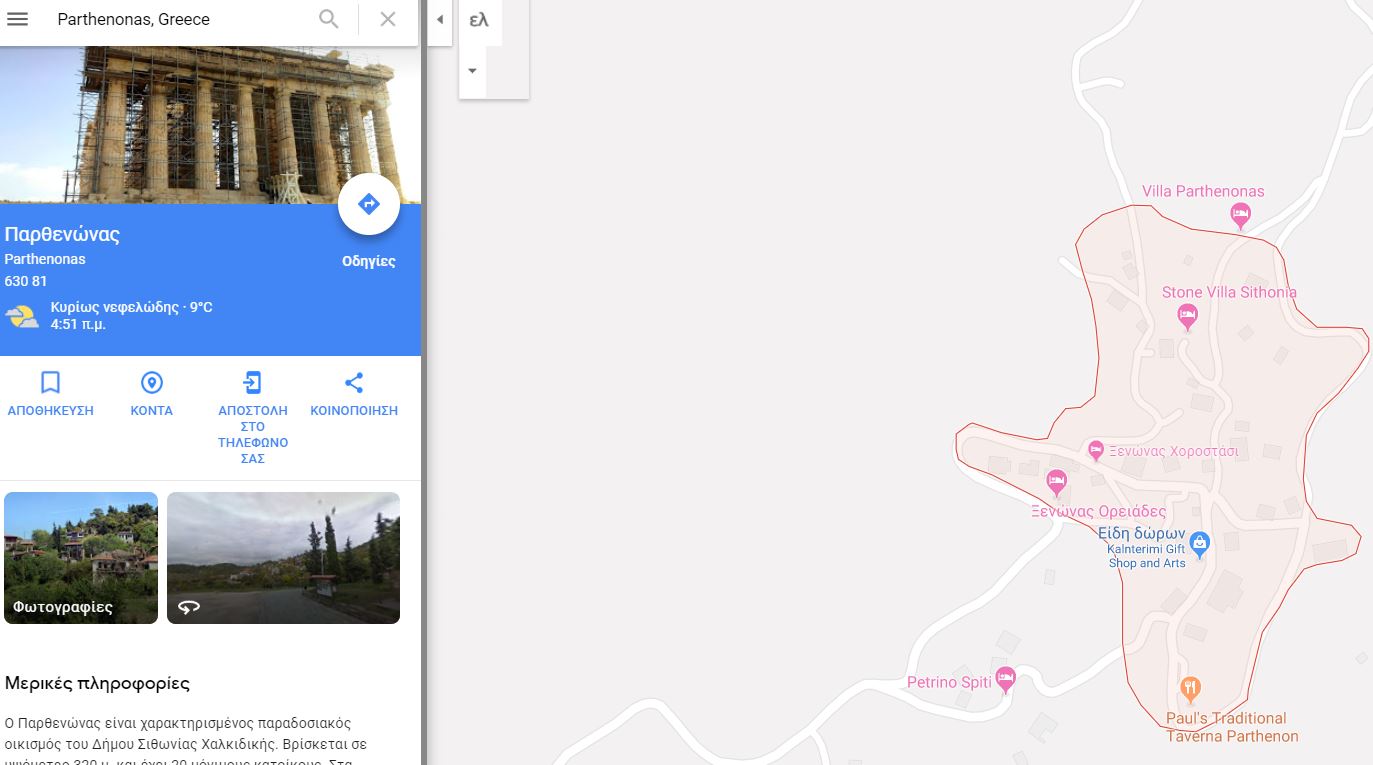
3. Adding a location and once someone clicks on it, google maps will automatically open with the specific location.
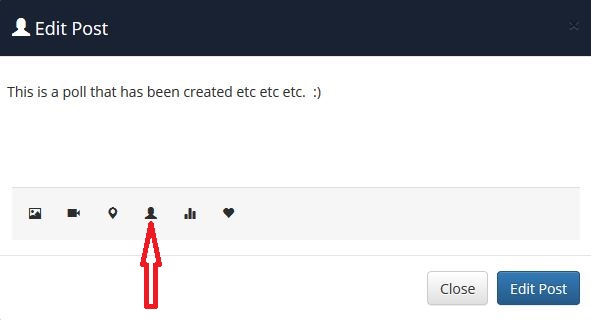
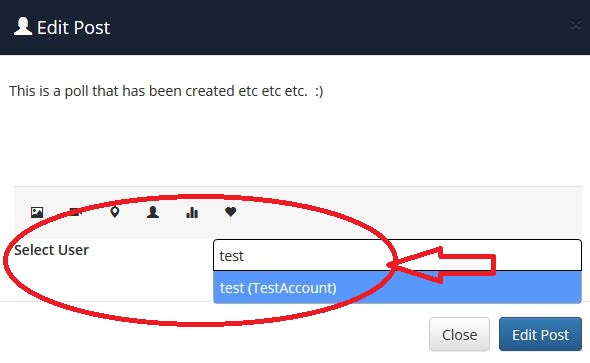
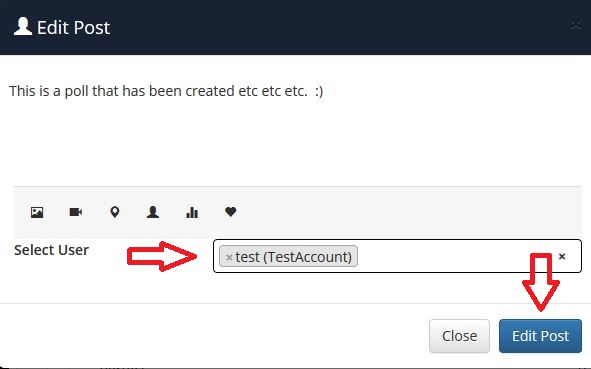
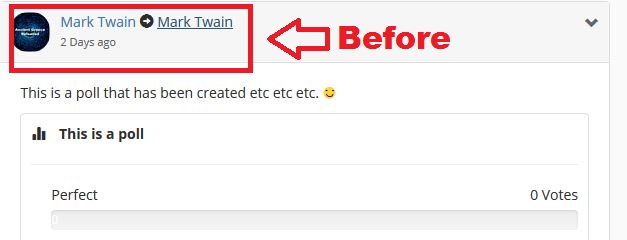
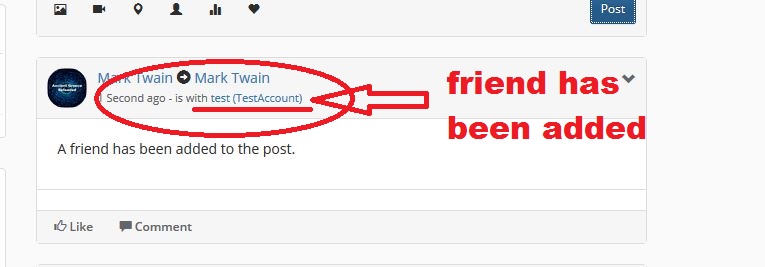
4. Adding a friend to your post (aka, tag a friend).
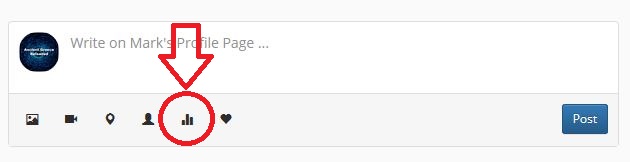
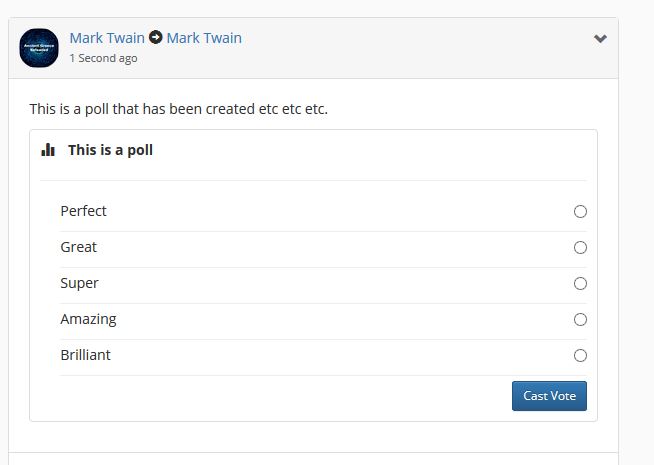
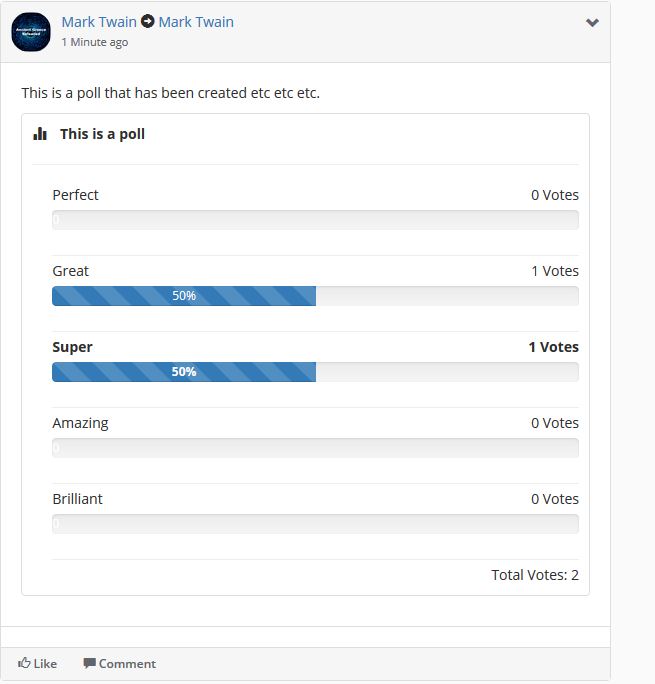
5. Create and start a poll.
6. Opens the smiley set.
7. Text area in which you can write.
8. By clicking on it you publish your post.
What follows are some consecutive pictures in which you can see the outcome of each of the aforementioned options.
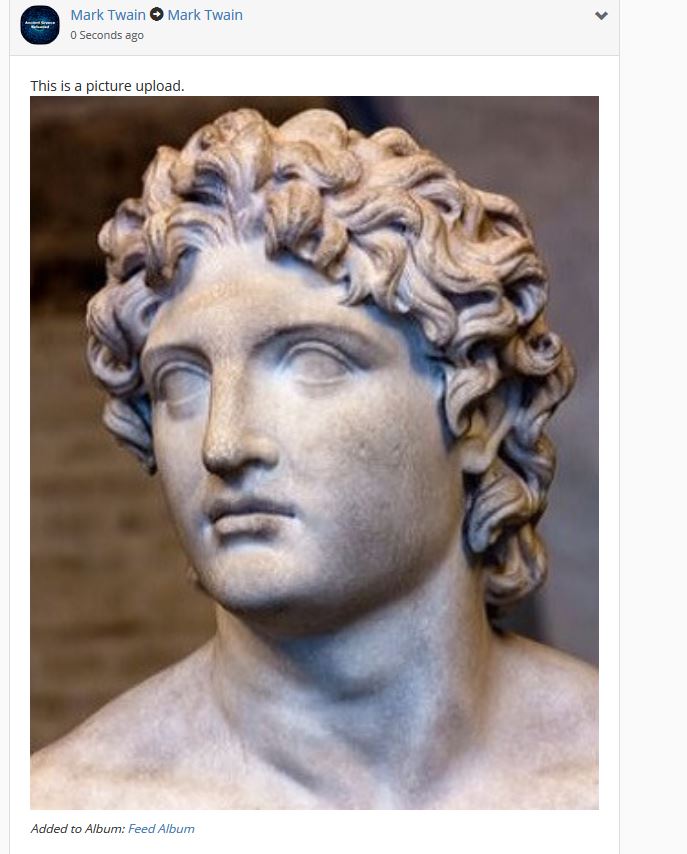
Adding a Picture
Please Note:
Preferred image types are: jpg, jpeg and png. Guys, if possible, at least at the launch of our social media platform, use mostly jpg image types so as to save storage space in our servers.
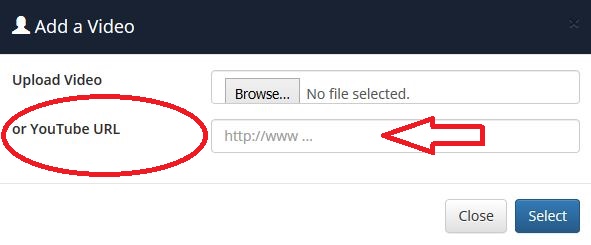
Adding a YouTube Video
Please Note:
So as to help us to save storage space in our servers, instead of uploading videos directly (if possible) use the direct links to your YouTube videos.
In other words, just copy-past the URLs directly to the YouTube videos (as seen in the pictures below).
Adding a location
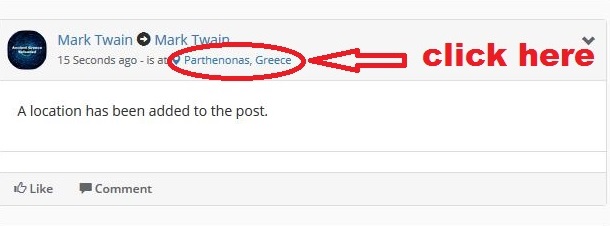
Google Maps open
Before we continue, let us see how you send a friend request ( please note: the search is based on the first and last name of a friend and not based on the username).

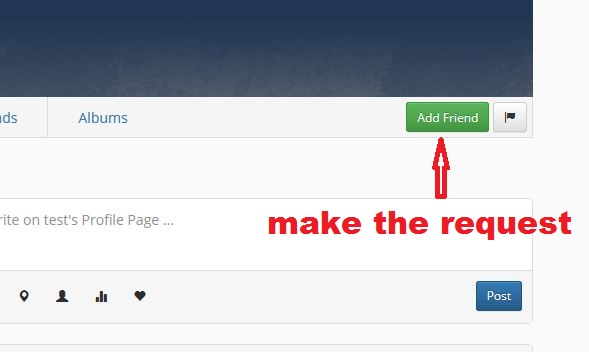
Back to the post options and how to add a friend, or friends, to a post.
How to add a user (aka, tag a member) to your post.
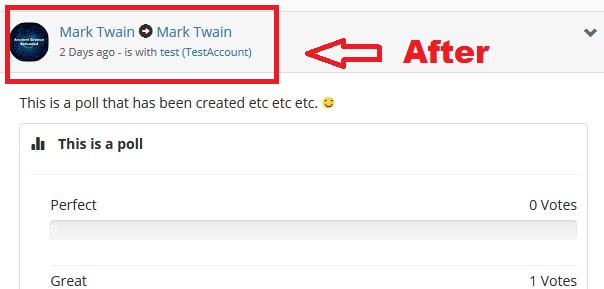
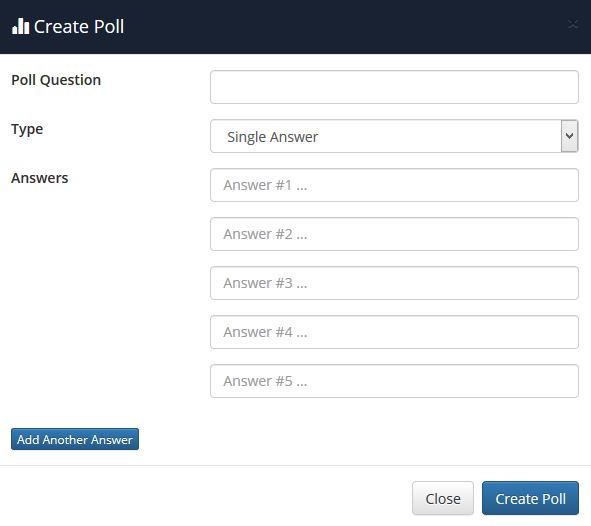
How to Create and to start a poll.
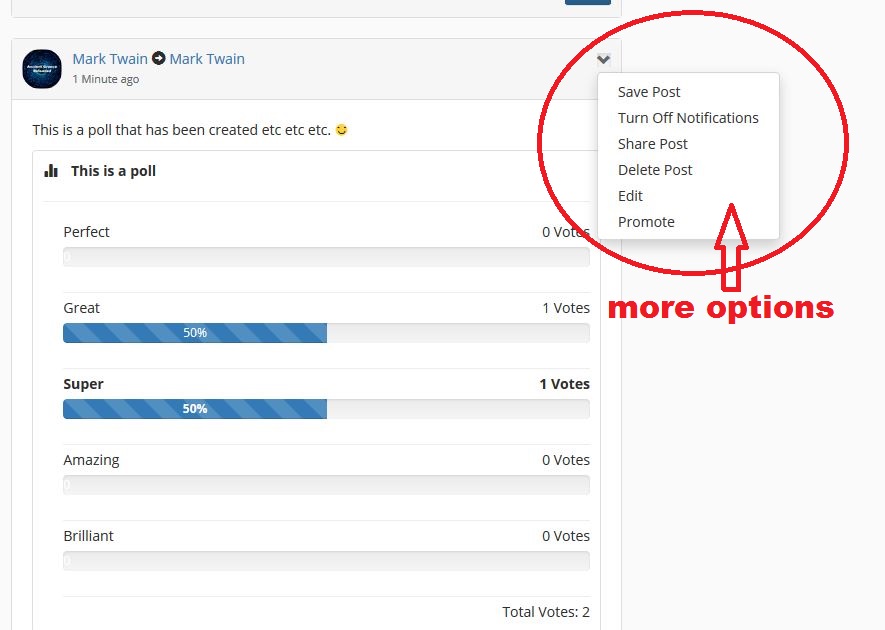
Additional Post options.
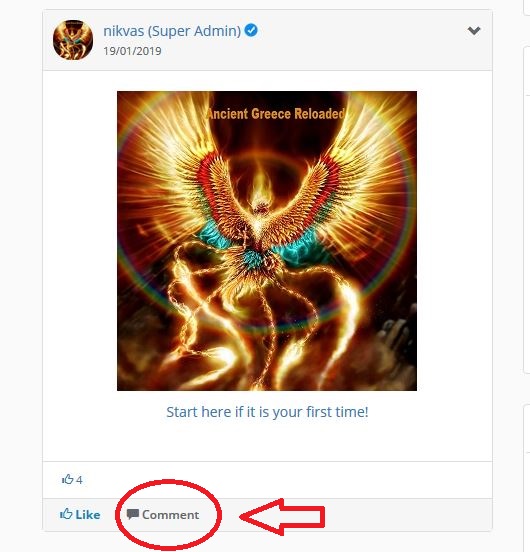
Adding Comments and Liking a Post
Go to the post that you want to like or to write a comment.
If you want to like a post, click the like button.
If you want to write a comment, click on the comment-button and start typing your remark.
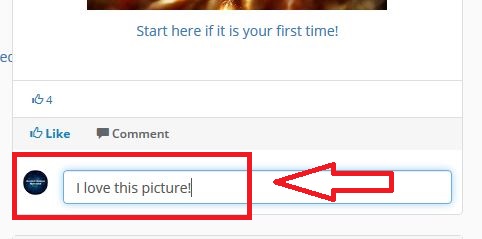
Once you are done; click enter.
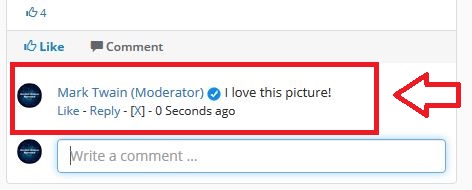
Your comment has been published.
Creating a New Page or Pages
By default, besides your main panel, you also have your own Profile page.
Moreover, you are also given the option to create new pages (for example if you want to promote your business, your work etc).
In this section we will show you how to do it.
First, click on the upper left corner so as to get to your main panel.
Next, click on the Pages icon.
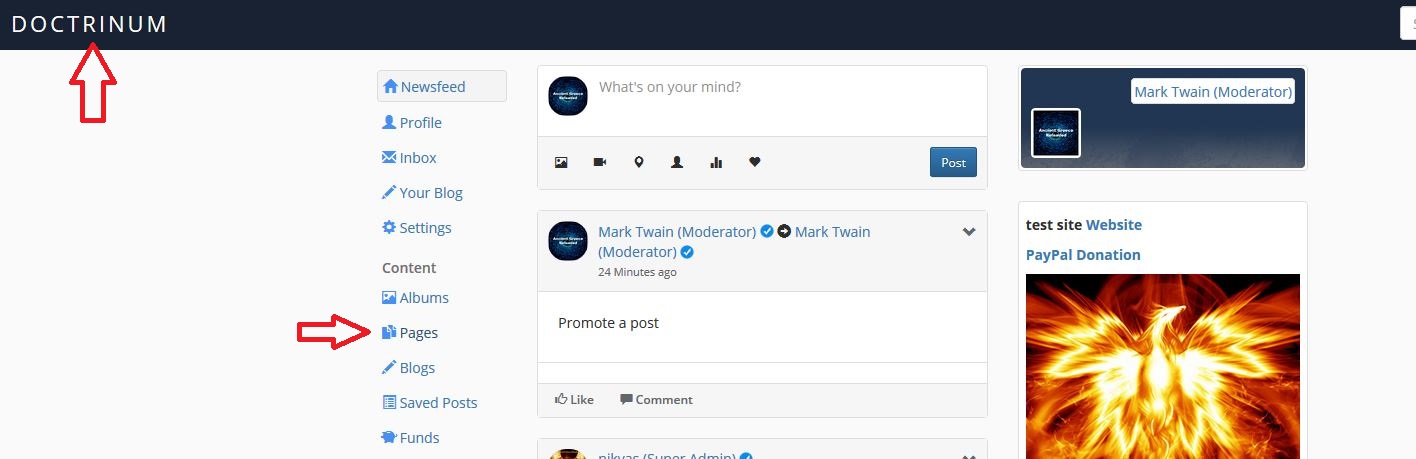
If it is your first time, and you have not created a page yet, you can click on the Add Page button and create your new page.
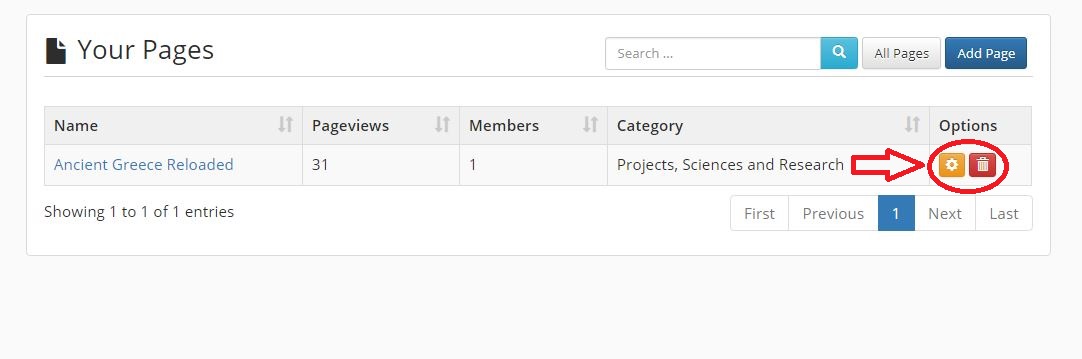
Otherwise, you can click on the edit or delete icons and perform further page customizations.
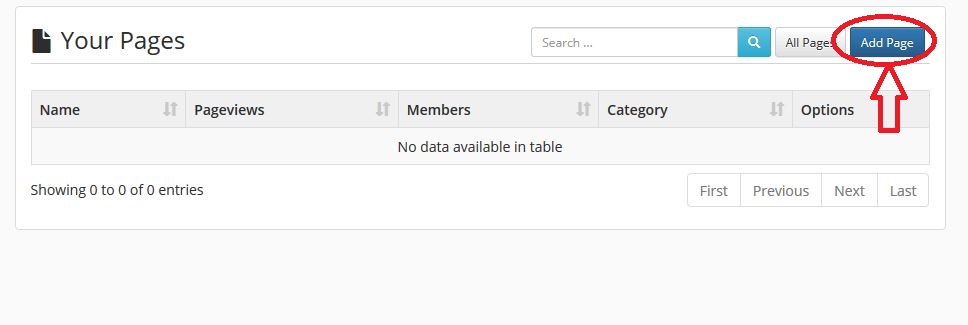
Going with the assumption that this is your first time and you would like to create your own new page, click on the Add Page button.
Next, you will be guided to the page panel.
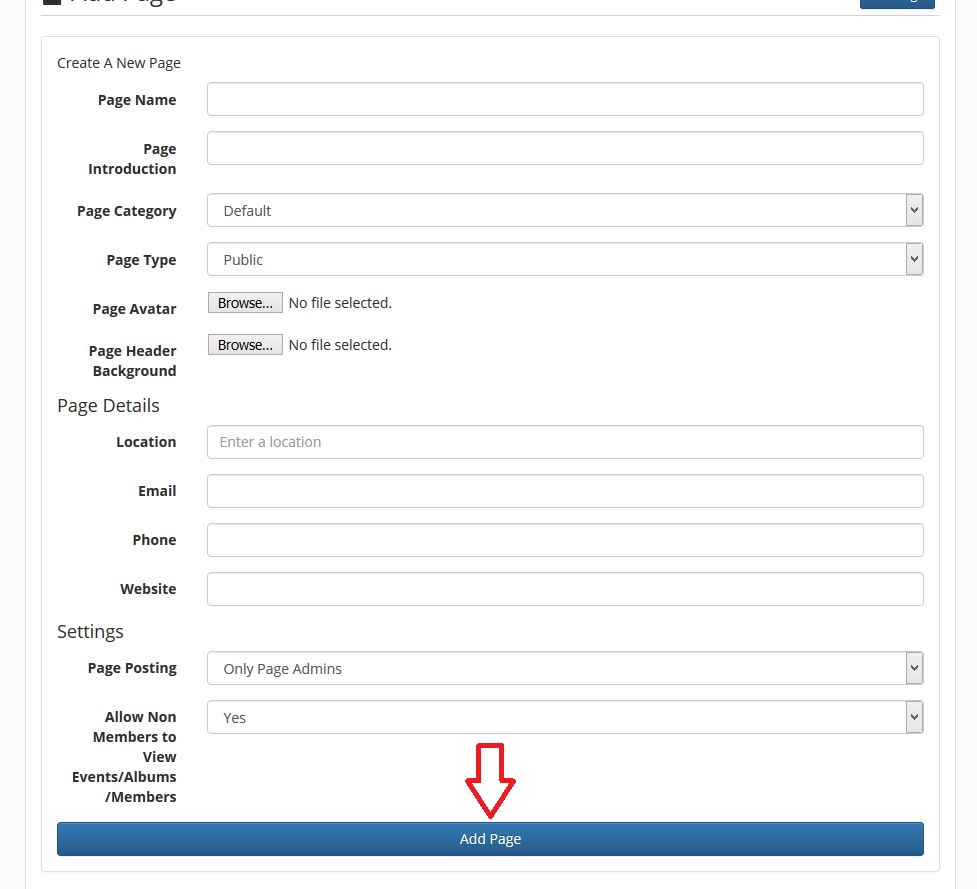
There you will be given various options, and fields, which you can fill out.
Once you are finished with whichever data you want to include, click on the Add Page button to publish your page (alternatively, you can also save your page as a draft and publish it later on).
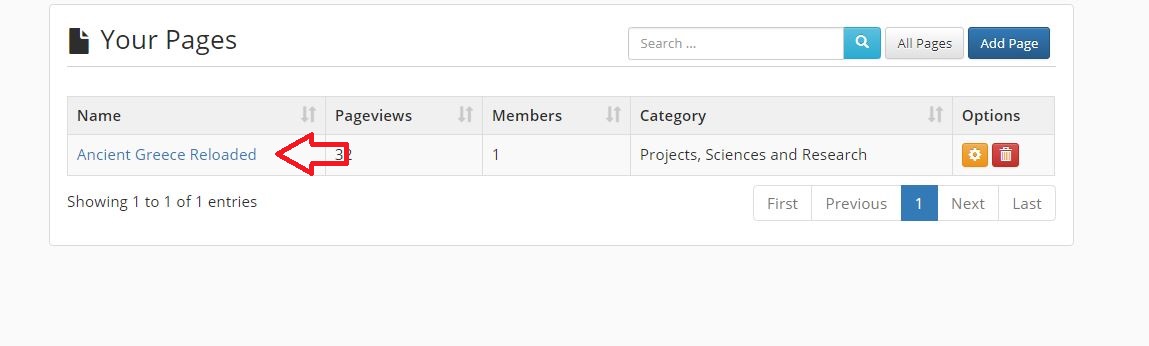
Finally, clicking on the name of your page you can open the relevant page of yours.
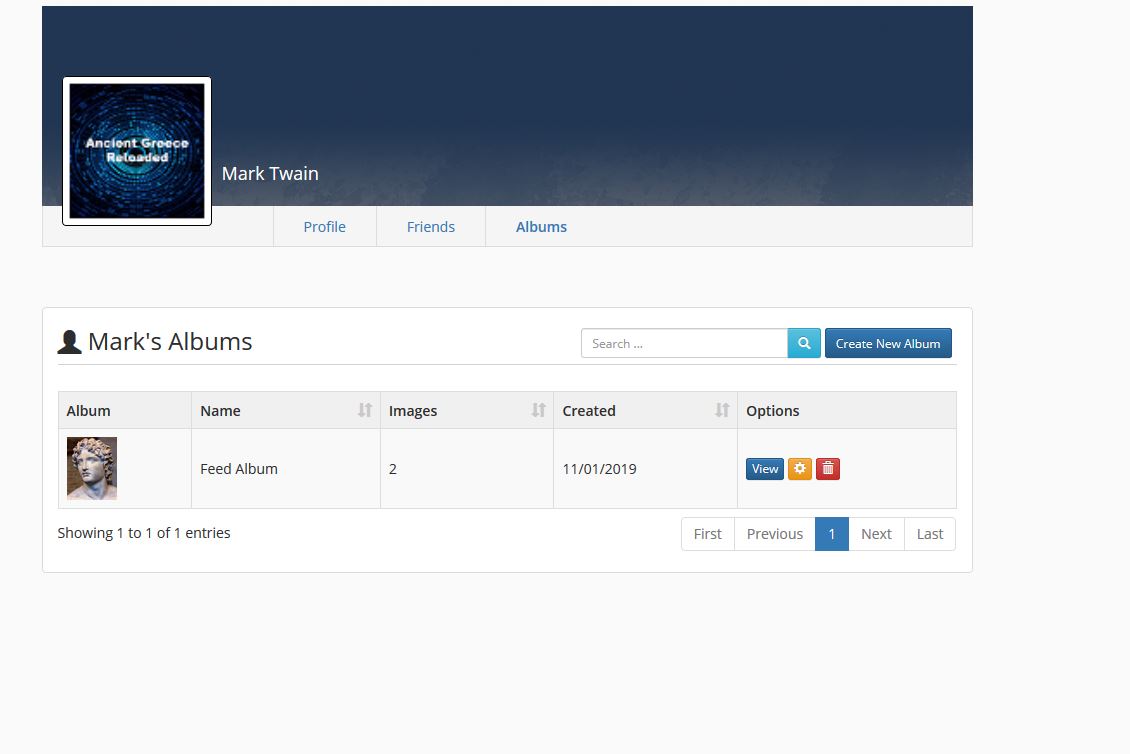
The Album Panel
A quick look to the Album Panel.
Creating Your Own Blog and Adding Posts
The social media platform of Ancient Greece Reloaded also allows its members to create and to run their own blog.
To initiate the process, go to the main panel (click on the upper left corner, on the name of the Social media platform).
In the main panel (at the left side) click on the option "My Blog" (right below the Inbox option).
Once you do, the Main Blog panel opens for you; and there, you can start your amazing blogging experience.
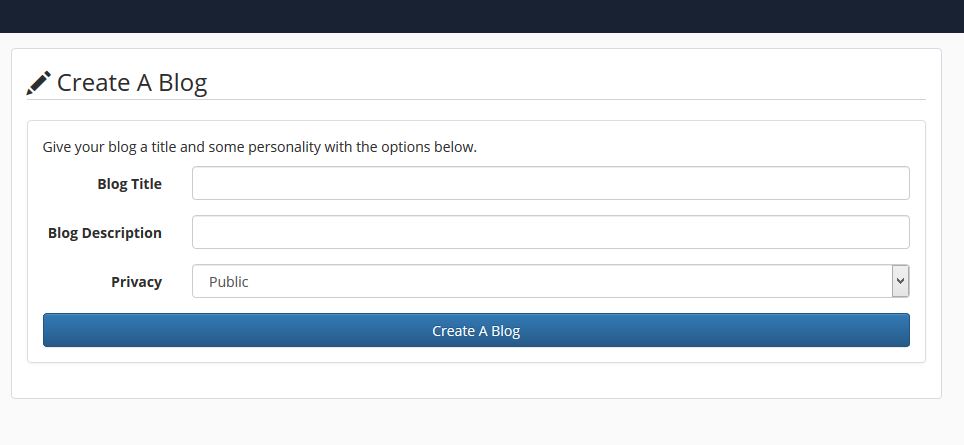
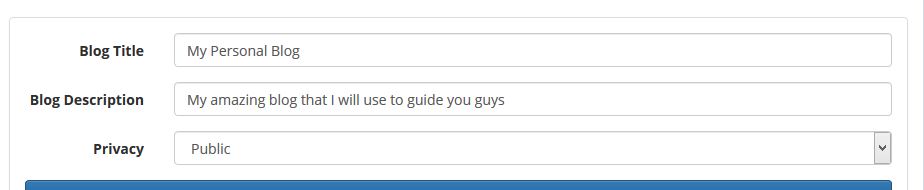
Fill out the relevant fields and click the "Create A Blog" button.
Once completed, the main panel of your Own Blog will open; and now, you can start your own amazing blogging journey.
Now, let us see in more detail how the entire Blogging system works.
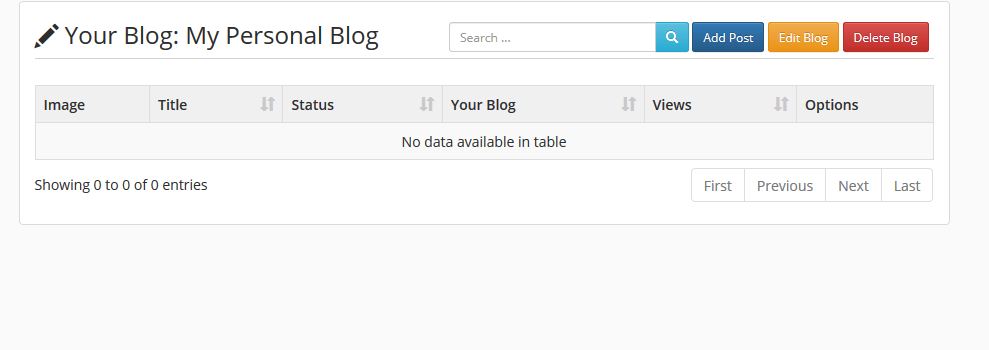
Once on the Blog main panel, you are presented with various options, and details, which are:
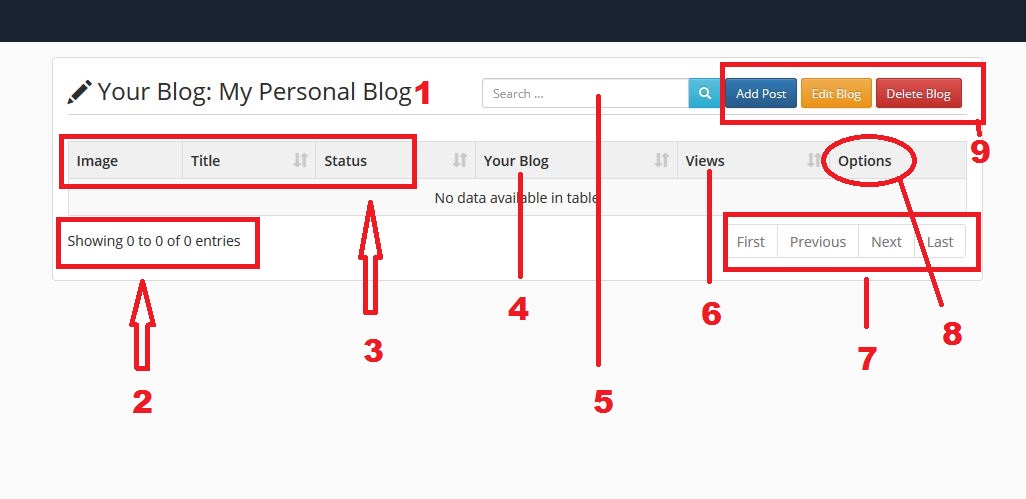
1. The Name of your Blog.
2. Shows the number of your posts.
3. Provides you with the overall info of a blog-entry.
Image: shows the main image that you did use for your blog post (think of it like the thumbnail of your blog post).
Title: The Title of your Blog post.
Status: If your post is published or in the Draft–State, which allows you to publish it at a later point in time.
4. The date that your blog-post was published.
5. Search engine allowing you to search for specific blog-posts and entries.
6. How many views your posts have received (in other words, how many people did read your post).
7. Navigating through your blog pages.
8. Options: Allowing you to edit or to delete a blog-post (options become visible once a blog post has been created).
9. General Blog control
Add Post: Allows you to create a new blog-post entry.
Edit Blog: Allows you to rename your blog, to edit the Blog description and to change the privacy settings of your blog (public or friends only).
Delete Blog: Allows you to completely delete your entire blog.
Below is an example:
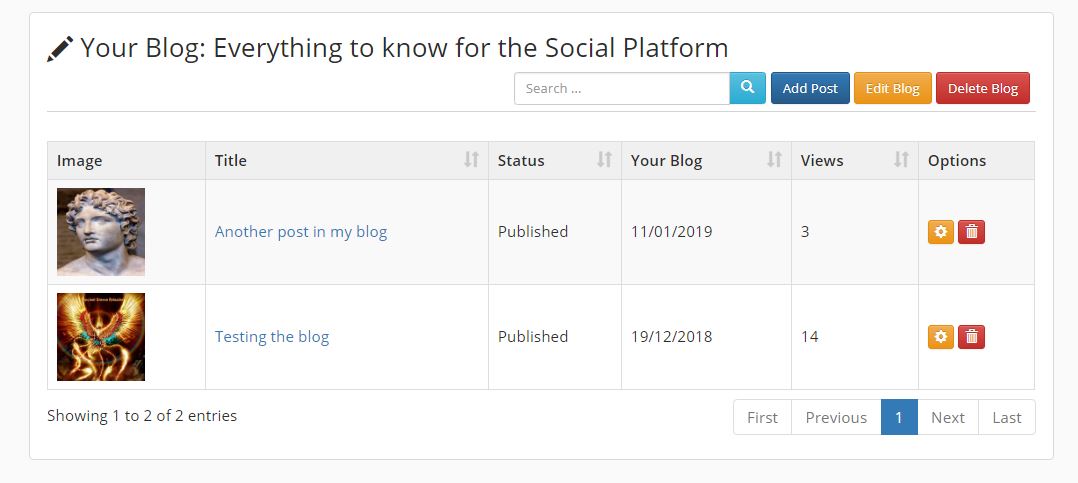
Adding Posts
First, click on the "Add Post" button.
Once you do, the post panel opens for you (as seen in the picture below).
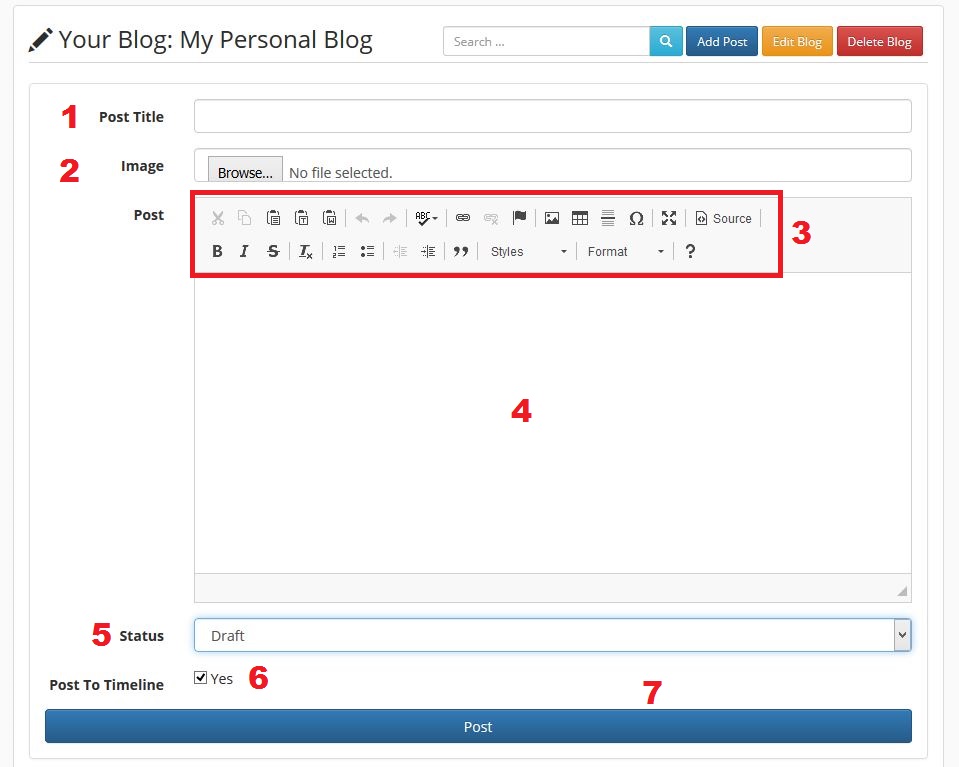
The options that will become available to you so as to write and to publish your blog-posts are as follows:
1. Post Title: The title of your blog-post
2. (Thumbnail) Image: This is the thumbnail image of your blog-post (see the picture above – for instance: Alexander The Great). Thumbnail size: 300 X 300 pixels.
3. Controls: The Control panel while writing your posts. Think of it like adding URLs, adding images, writing in bold and all this beautiful stuff that will allow you to customize your blog-post as you see fit.
4. Post Area: Here is the area in which you actually write and create your post.
5. Status: Choose between the options of saving your post as a Draft or if you want to Publish it.
6. Timeline: If you tick that box, your blog-post will also appear on your (own main profile page's) timeline.
7. Post button: By clicking on the post-button you publish your post or save it as a draft (depending on the choice you make).
Chat, Private Messages, Invites and Private Conference
In this section we will focus on how to utilize the full power of Chats, Private Messages, Invites and Private Conferences that you can have with your friends or other members.
The Simple and Basic Way:
From your Friends list (right side) double click on a friend that you wish to chat with:
Next, the chat window appears and now, you can chat.
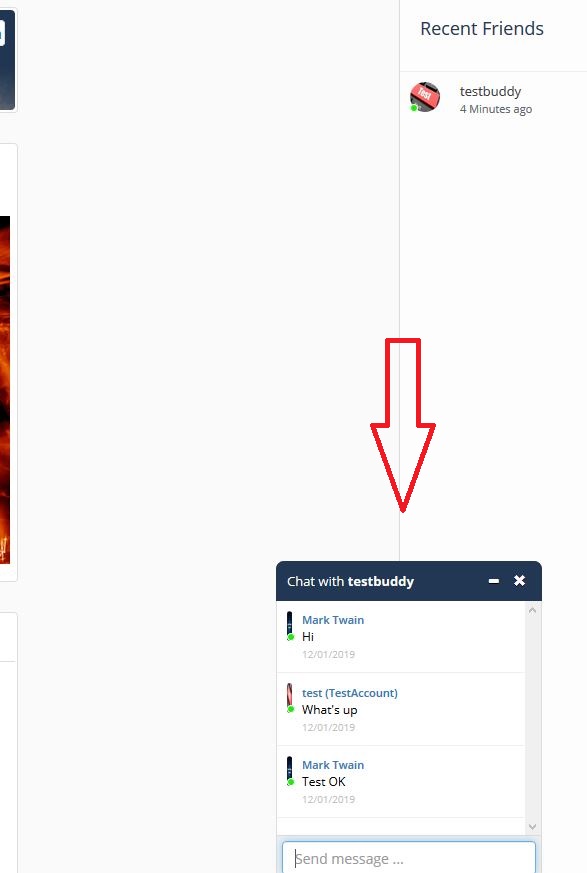
The Advanced way:
If you wish to chat with your friends, in a more elaborated way, than you can utilize the full power of our social media platform’s chat options.
Thus, let us see how it can be done.
Go to your main panel (by clicking on the left upper corner)
Next, click on the inbox icon.
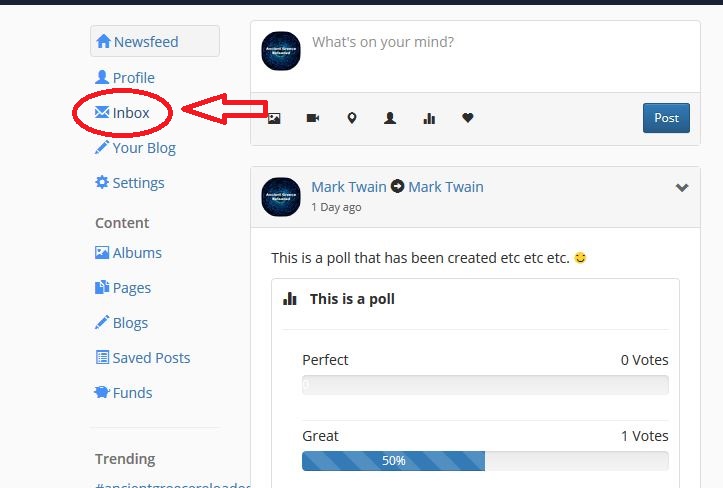
Once you do that, you will be presented with the main "Messages Panel".
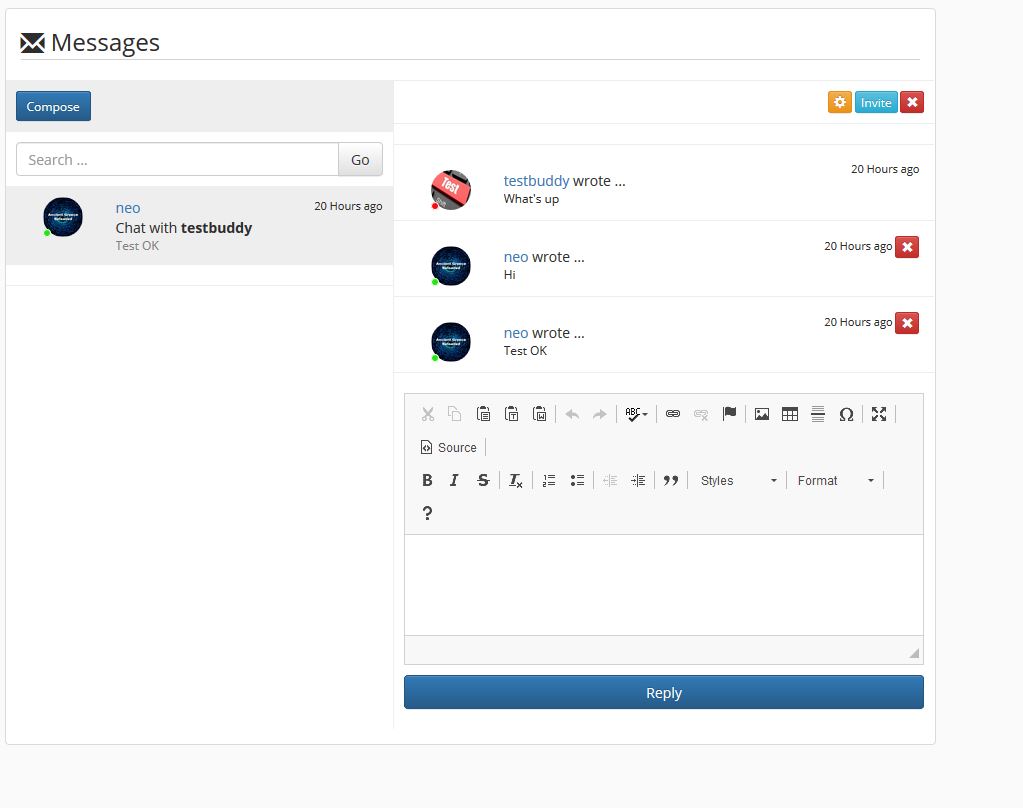
The various options that become available to you, are as follows:
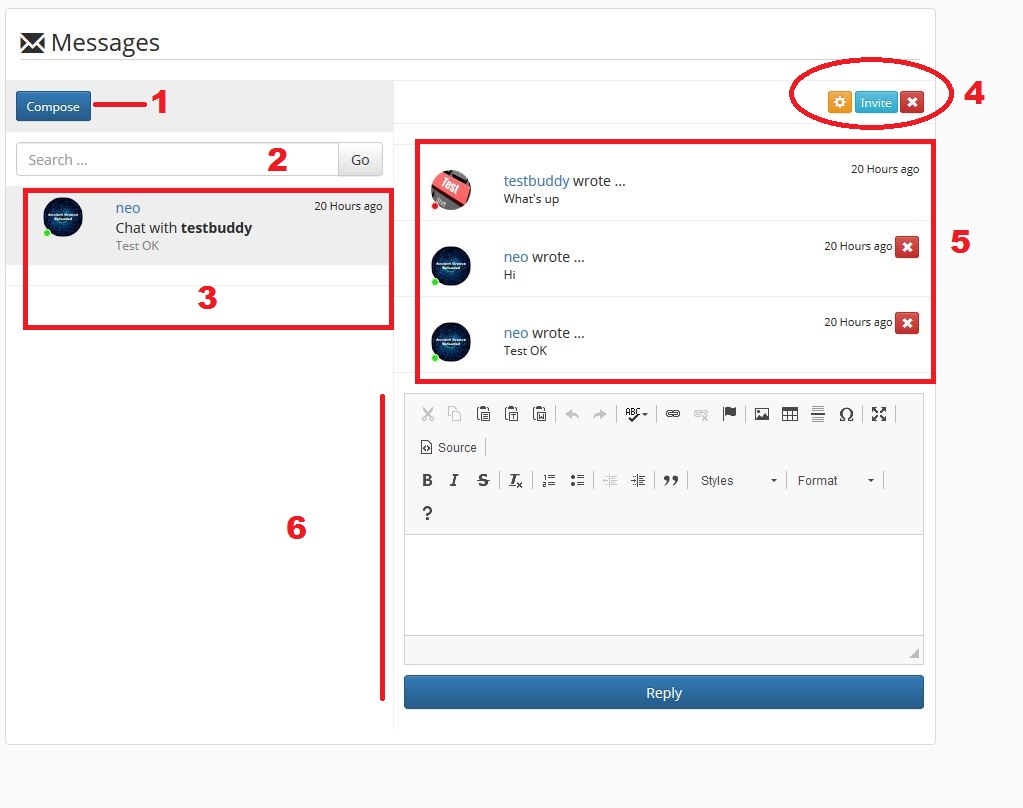
1. Compose: Create a new message
2. Search bar: Perform search
3. Convo list: The list in which all of your message/chat sessions appear. Clicking on it, you can review past conversations
4. Initiates Conference chat: Initiates Conference chat: Utilizing these options you can initiate a conference chat between multiple users (see below)
5. The Messages during a chat session: Illustrates all the messages during a chat session as well as of all past chat sessions (if you click on the Convo List - which is discussed in point 3)
6. Chat / Message Area: Here you can write more advanced type messages in contrast to the typical, aka basic, chat window.
Please Note: You can enter the advanced Message/Chat Panel at anytime, even if you are currently just using the basic chat window (if necessary, just refresh the page in the advanced message panel and you are good to go).
PM another user
In the Advanced Message Panel click the "Compose" button.
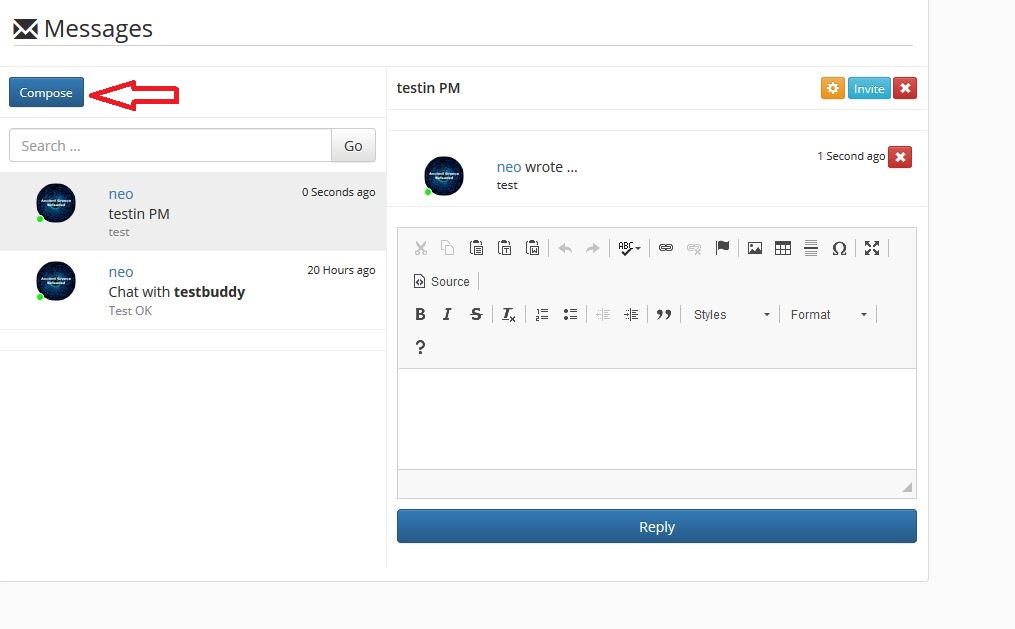
Search for the user/member that you want to send the PM; and select the user.
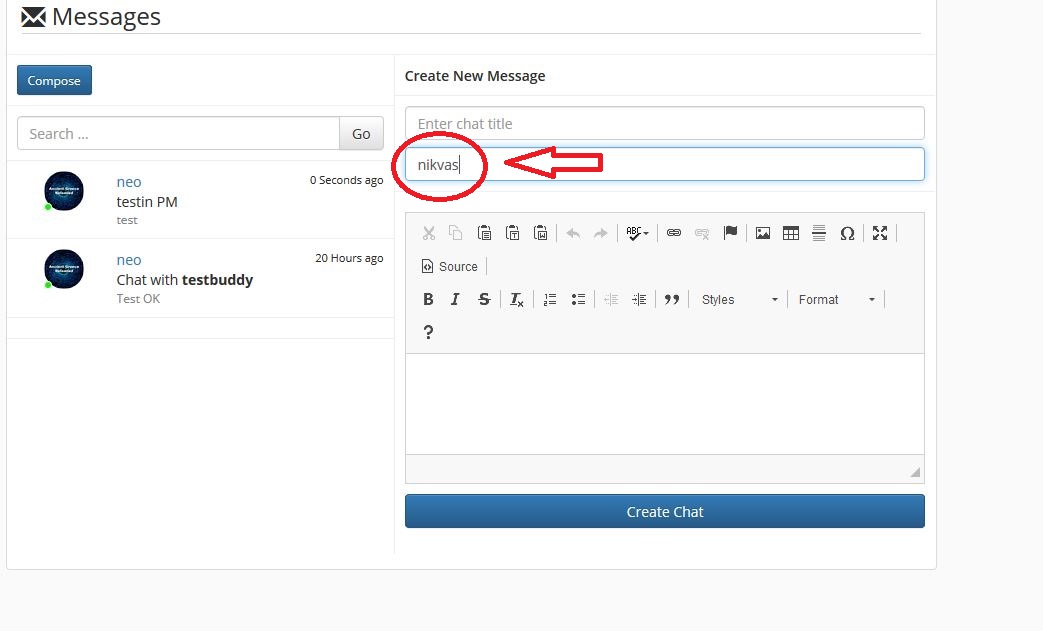
Next, write the chat title (aka the subject of your PM)
Compose the message.
And click on the "Create Chat" button.
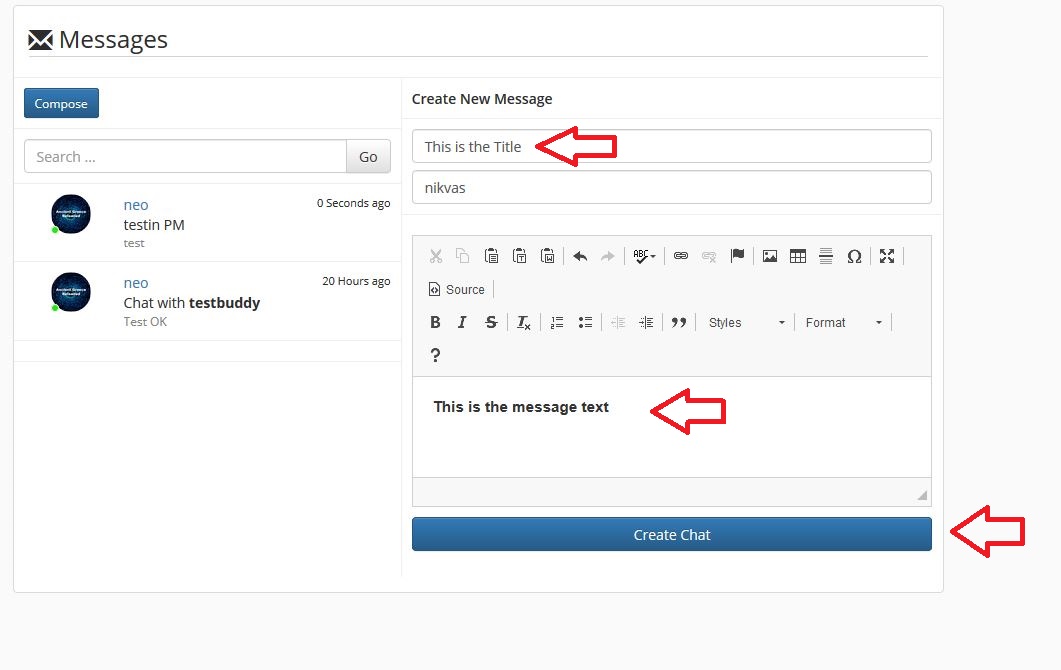
You are done.
Private Conference with Multiple Members
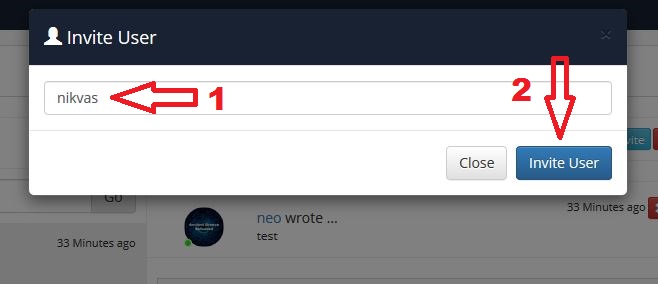
In the Advanced Message Panel click the Invite option.

Next, you are presented with the invitation panel.
Search for user/member that you want to invite.
Invite User (aka, send the invitation to the member).
Next, in the main message panel and as you are carrying out your chat, click on the chat-edit-wheel.
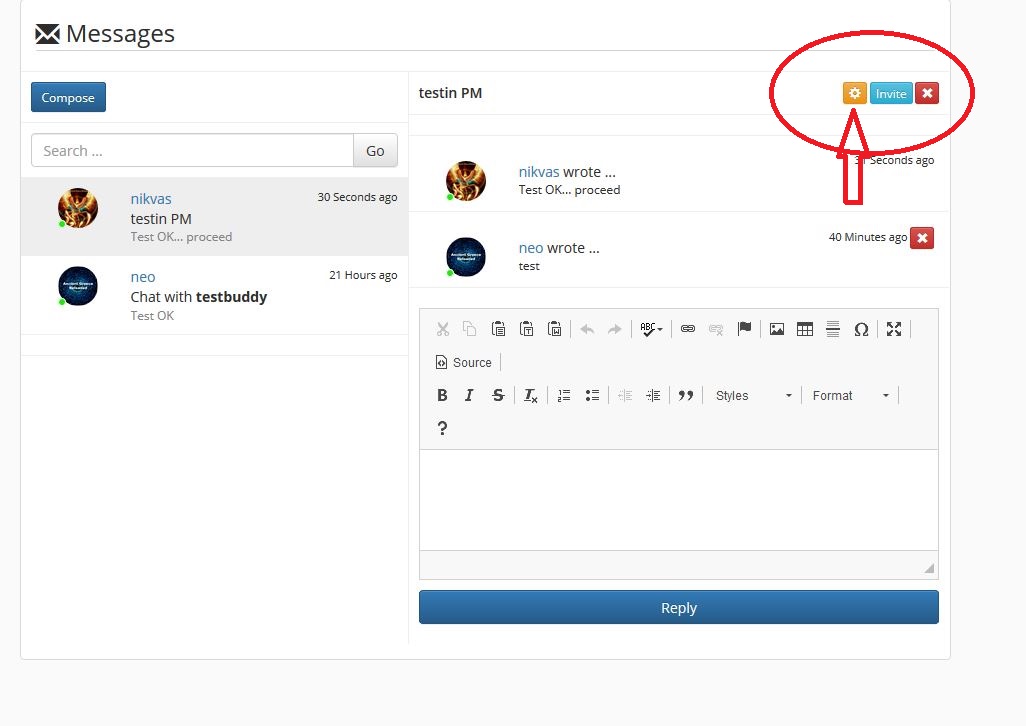
This, will get you to the main chat-conference panel.

1. Chat Title: The title (aka, the name) of your current chat that you want to turn into a conference between multiple users.
2. Chat Users: Search for (additional) User, or Users, that you want to invite to the conference
3. Invite User: Click the "Invite User" button to send the invitation to the specific member
4. Username: Members that are currently taking part in the conference.
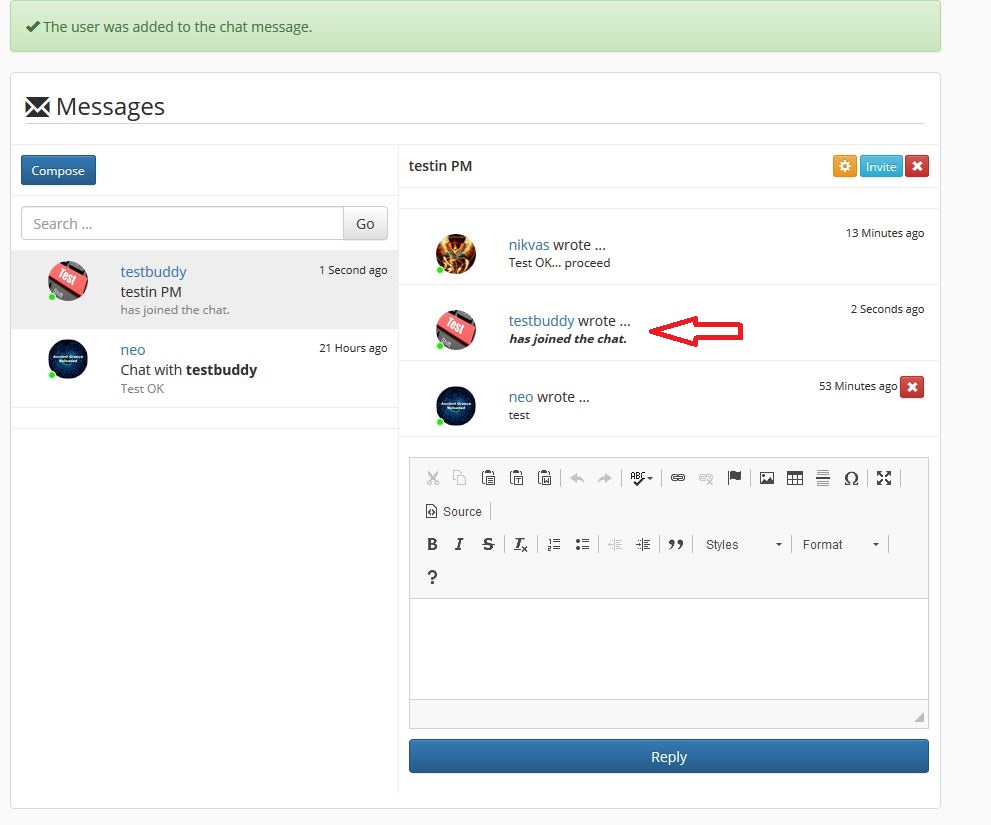
You are done.
Picture (below): Third (additional) member has been added to the conference.
Picture (below): Instead of two, now, you have three members taking part in the message-chat conference.
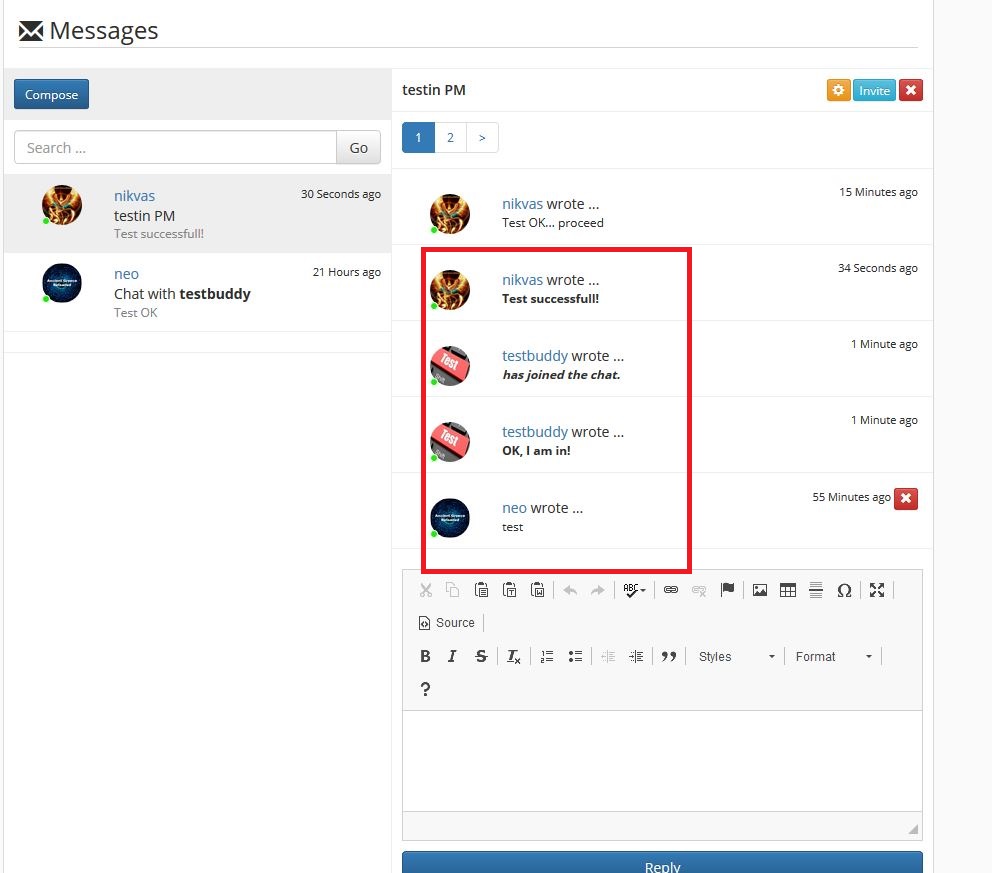
Finally, as more and more messages are added, during a conference meeting, instead of going for an endless "scroll down" approach, that would follow the slot-machine pattern (thus, affecting negatively a user's subconsciousness); we preferred to add pages.
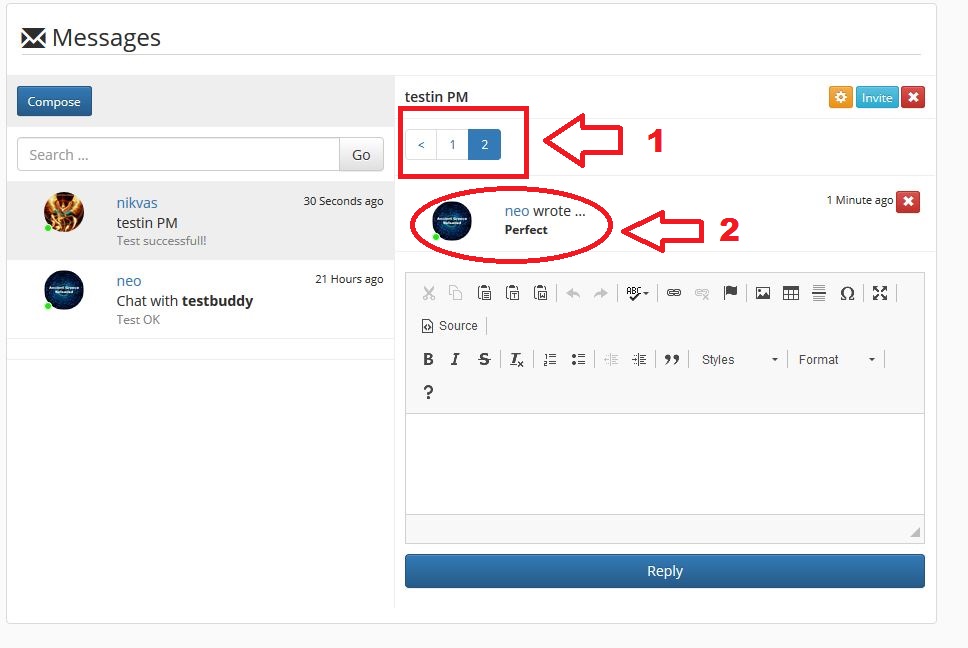
Hence, on the one hand - we keep the design clean and ordered while, on the other hand - we make sure that the members of our social media platform are in full control of their chat experience.
Hashtags
If you so desire you can also make use of hashtags.
By making use of hashtags, at the end of each of your posts, you not only make your posts trending but can employ the power of hashtags; so as to search for specific posts, that utilize the specific hashtag or part of it.
In this section, we will show you how to do it.
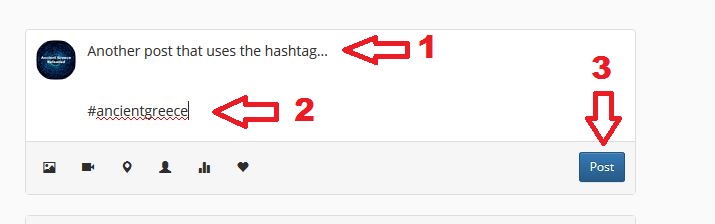
First, write your post.
Once you are done, and before posting it, add your hashtag.
After adding your hashtag, proceed and publish your post.
In our example, we use the hashtag: #ancientgreece
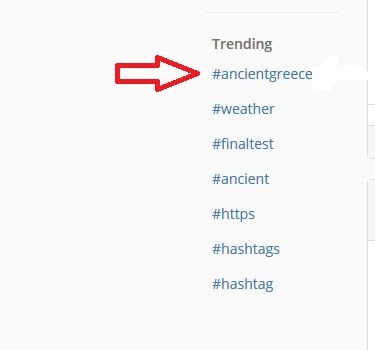
If you want to search for posts that use the #ancientgreece, go to your Main Panel (either through your newsfeed or by click at the upper left corner – aka, at the name of our social media platform).
Once there, click on the hashtag of your interest.
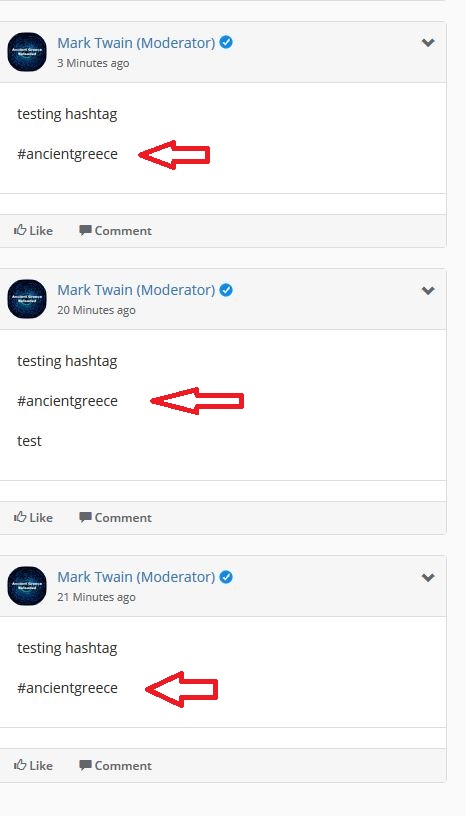
Thus, in your newsfeed the posts that use the hashtag of #ancientgreece will appear.
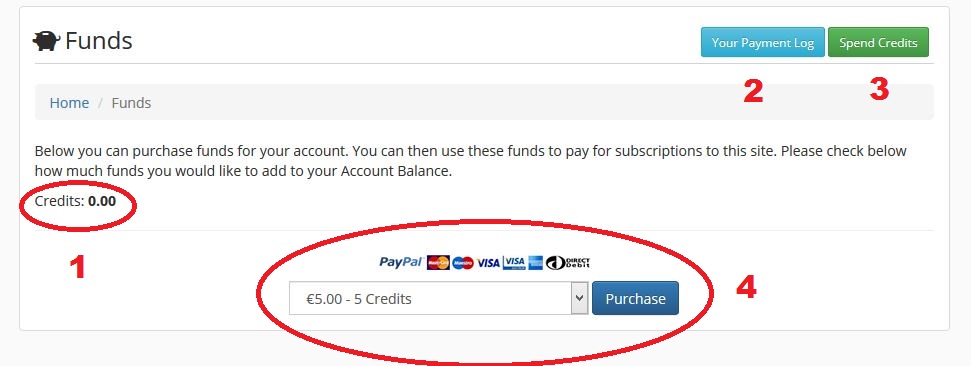
How to get your Credits
In order to perform any action such as advertisement, promotion or to initiate the verification process, you will require credits.
Consequently, in order to get your Credits, do the following:
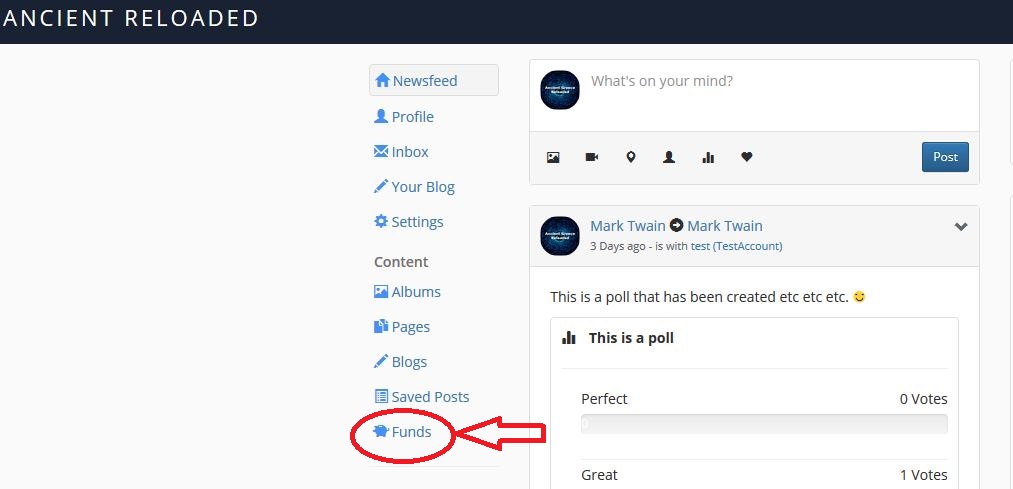
Click on the upper left corner so as to get to the main panel.
Next, click on the Funds Icon, so as to open the Funds panel.
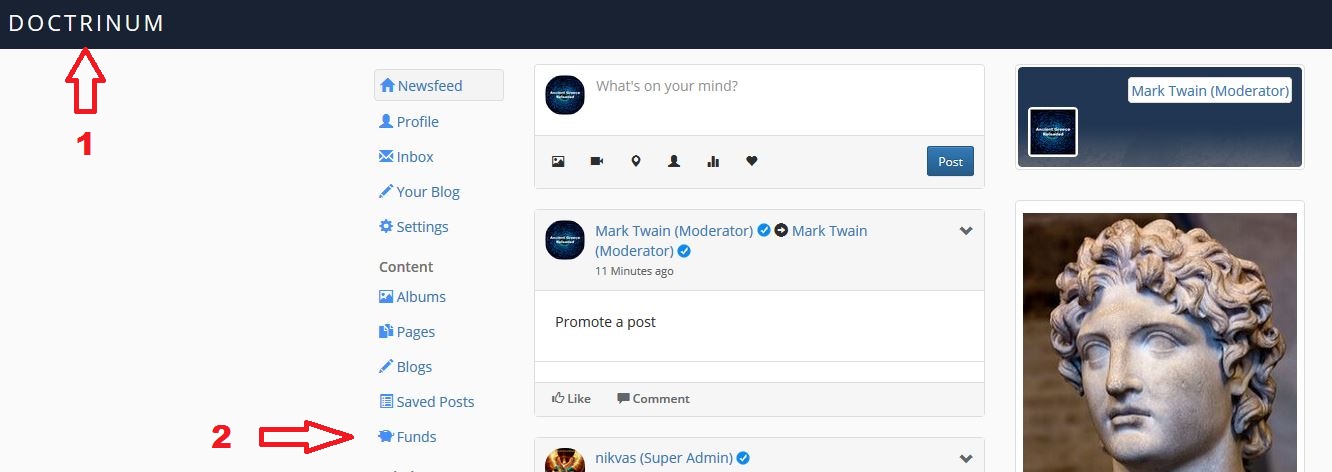
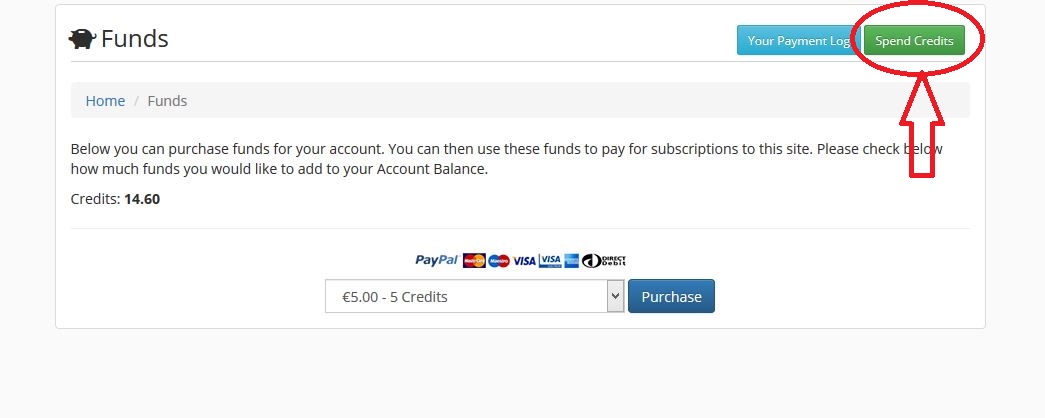
Select how many credits you want to purchase.
Click the purchase button so as to complete the process.
Advertising and Promoting yourself and your work
Before we begin illustrating how to advertise yourself, and your work, let us clarify something.
In contrast to other social media platforms, we do NOT block or hide your posts, in any way, from neither your friends nor your followers.
For example:
Let us say that you have 1000 friends, or followers, and you publish a post or a blog-post. All of your 1000 friends will receive a notification about your post; as well as, your post will appear in their main newsfeed section.
Consequently, there are no hidden mechanisms to block your reach to your friends and followers. Full information flow is allowed!
The question that arises is: why would someone want to promote (aka, advertise)?
Because, although we do allow the free flow of information towards all of your friends and followers – we do not allow it to reach people that are outside of your social circle; because otherwise, it would turn into spam posts.
Thus, if you want to extend beyond your circle and make something known, like a new book, a new research etc. you will have to go through the promotion process.
What is more, we allow promotions but in a very clean and clear way – as it has been described previously in the current user guide.
In other terms, advertisements may appear but never in an intrusive way to the user.
We strongly believe, that through this approach both sides can be satisfied:
The person that runs a promo can reach other members outside of his or her circle
while the members that see these advertisements do not experience an intrusion to their user experience.
That being said, let us go into the topic of how to initiate an advertisement or promotion.
The Process
First, click on the upper left corner (at the name of the social media platform) so as to get to your main panel.
Next, and so as to be able to launch your campaign of promotions, you will need to add some funds to your account.
Thus, click on the funds icon.
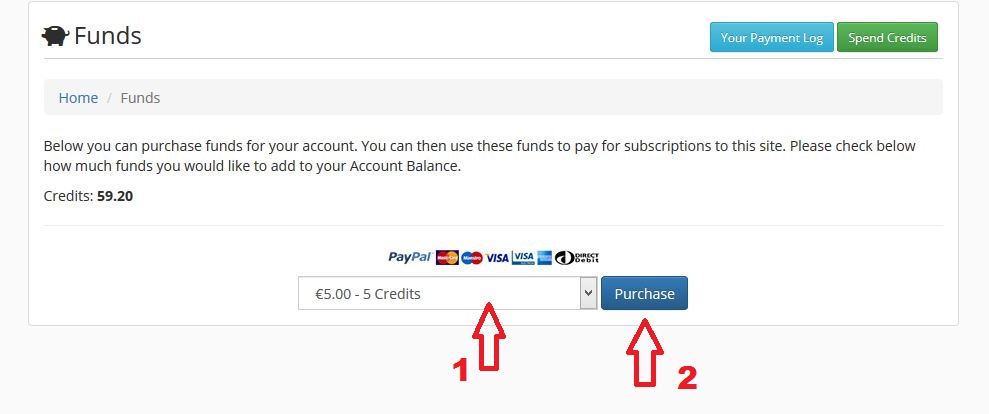
This will get you to your main "Funds Panel" which will allow you to purchase as many funds as you consider necessary for your campaign or any other purchase.
Please Note: The "Funds Panel" has been designed in such a way that allows you to have complete control and oversight of all of your investments, prior and after any purchase.
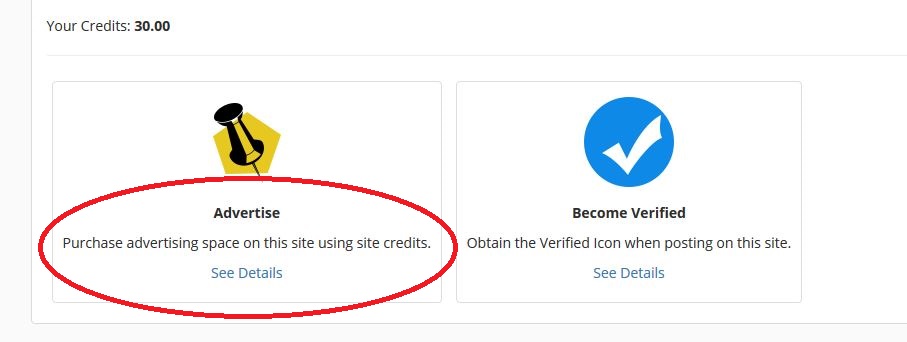
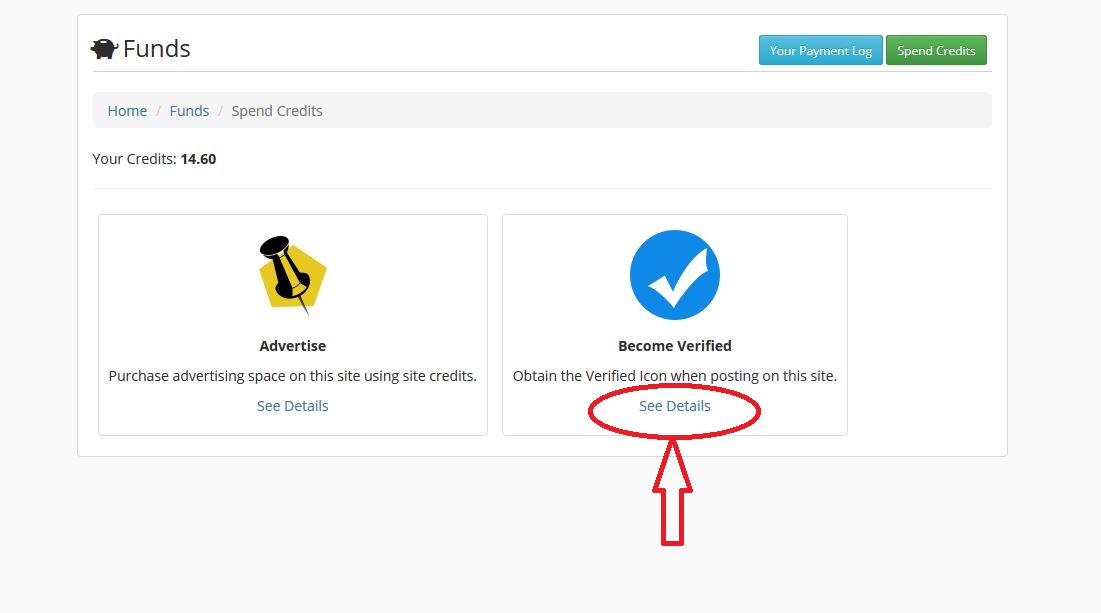
Once at the main panel of your funding, there are four points that you should turn your attention to, which are as follows:
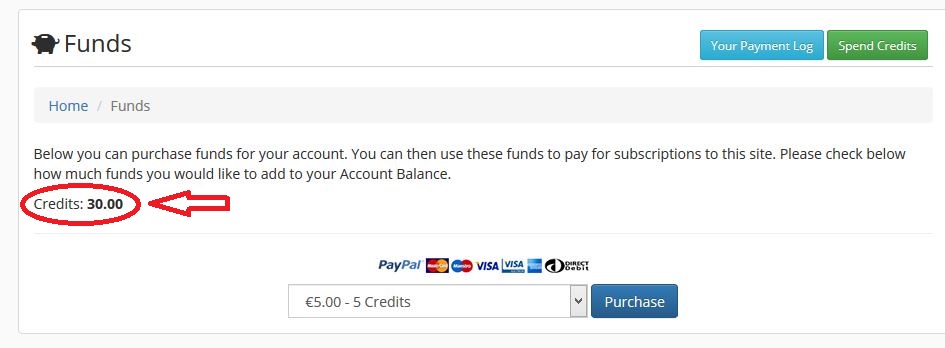
1. Credits: Shows how many credits you have available.
2. Your Payment Log: Illustrates all of your (past) credit purchases.
3. Spend Credits: Allows you to decide how you would like to spend your credits.
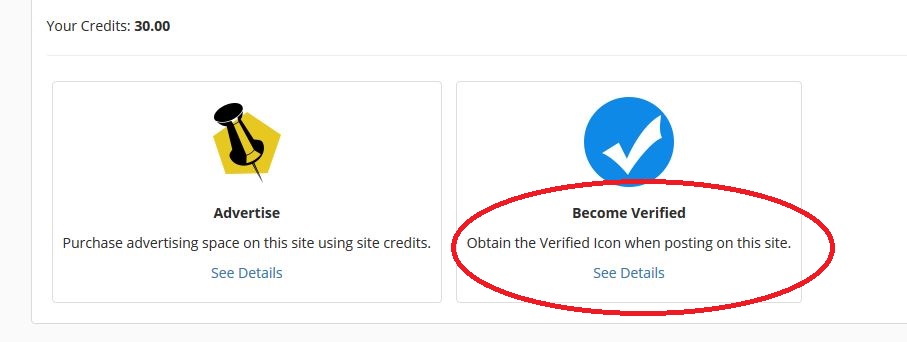
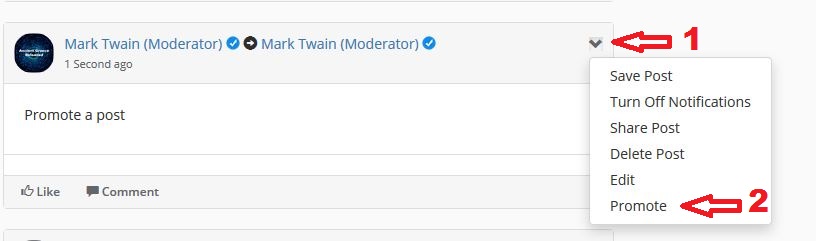
Please Note: currently, aka – as these lines were written for the user guide – we had integrated two, of three, main options in the funds panel; advertisement and becoming verified. In the near future we will integrate more options which will become available to you. The third option is by promoting a post which can be accessed directly through the additional options from your posts.
4. Purchase: Allows you to purchase the amount of desired credits.
Once you have purchased the desired amount of credits, they will appear on your Funds Panel.
From there click on the "Spend Credits" button at the upper right corner.
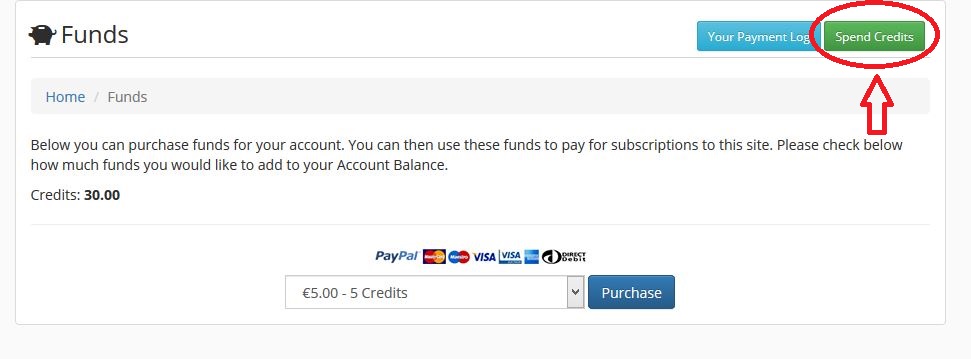
Next, a new panel will open which will allow you to start your advertisement or promotional campaign.
Or to launch the verification process.
Both cases, whichever you choose, are straightforward to set up and you are practically guided through it.
The Advertisement Process:
So, the main question that arises is: How does the advertisement process work once you have created your promotion?
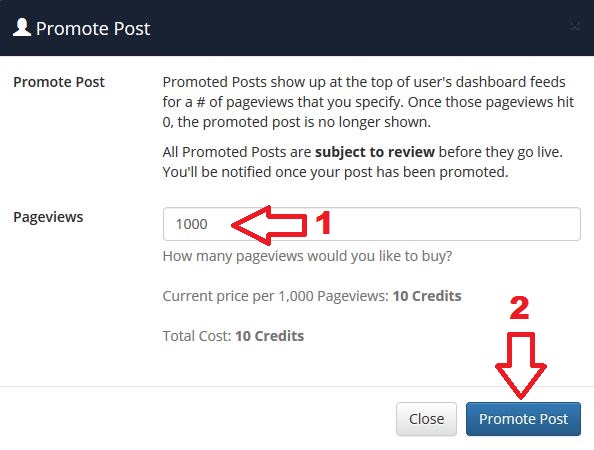
Let us say that you bought 1000 Pageviews (which can be a direct link to your own company's website, a picture or whatever else - it is your campaign).
The promotion will run constantly until the limit of 1000 pageviews will be reached; this can happen in a matter of hours or can run for a week.
The philosophy in our social media platform is real organic reach!
Thus, some of the parameters that can affect the timeframe are: how many ads are running simultaneously, how many members are (currently) active, aka logged in and so forth.
Please Note: The promotions and advertisements are 100% organic views!
What is more, the countdown will be affected only(!!!) when your promotion appears on someone's panel or profile page; otherwise, your number of pageviews will not be affected.
Promoting a Post
Let us go with the assumption that you have written this amazing post and now would like to promote it outside the circle of your friends and your followers.
So, how are you going to do that?
Below, we illustrate to you how you can do it.
Become Verified
You have decided that you want to protect your work, your name, you company etc – or you want to promote your work, your research and so forth; and in this case you want others to be able to recognize you.
You want others to know that you are the real one and not some fake that is going with your name.
For example, if you look around in other social media platforms you will see that there are dozens of accounts with the same celebrity; so, who is the actual celebrity and who of all them are the fake ones?
Indeed, in some cases it is easy to distinguish them but, in most cases, it is not; thus, people fall prey to so many fake accounts.
For this main reason we have created the "Become Verified" process that gives you the power of authenticity!
An additional reason is that you decided to become a moderator and to actively support the Social Media Community of Ancient Greece Reloaded. Consequently, and in order to apply for a role as a moderator, you will need to be a verified member first; before proceeding with your application.
So how does it work and how to you get the Authenticity badge?
In this section we will show you how it can be done as well as answer a few potential questions that may occur in your mind.
Please Note: Once the verification process has been initiated, credits are not refunded; similarly, for the case if your verification request will be denied.
The Process:
To become verified you have to perform the following steps:
Click on the upper left corner so as to get to the main panel.
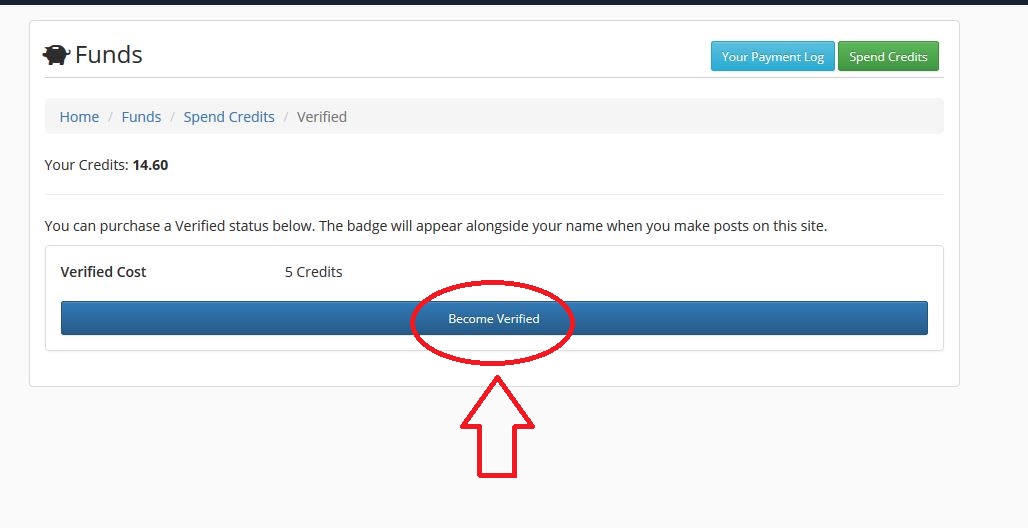
Click on the Funds Icon
Click on the Spend Credits Button
Under the Become Verified Box click on the See Details option
First, click on the "Browse" button to upload an official document in with your picture and your name can be seen (the rest of the info you can erase through a program); which will allow us to confirm your identity.
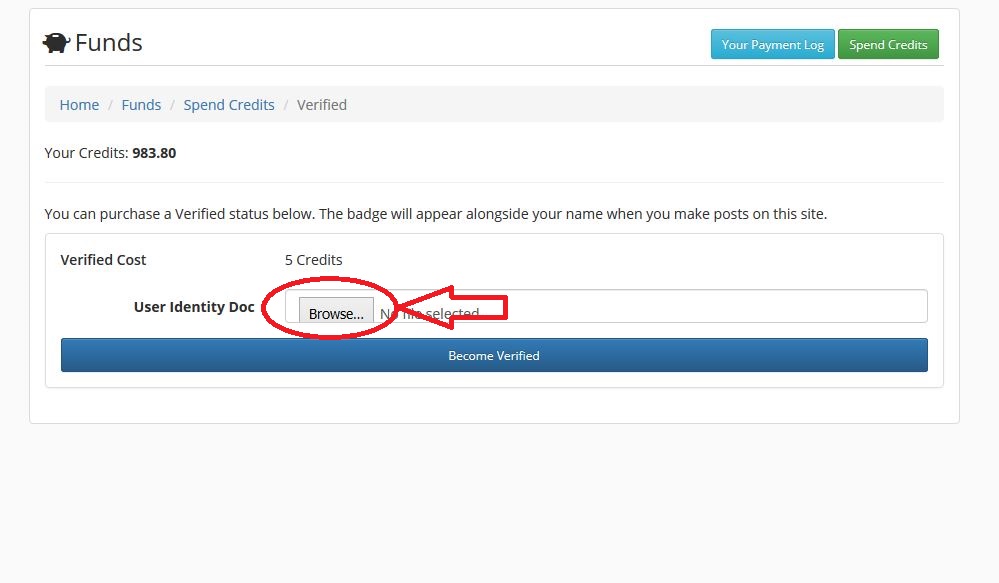
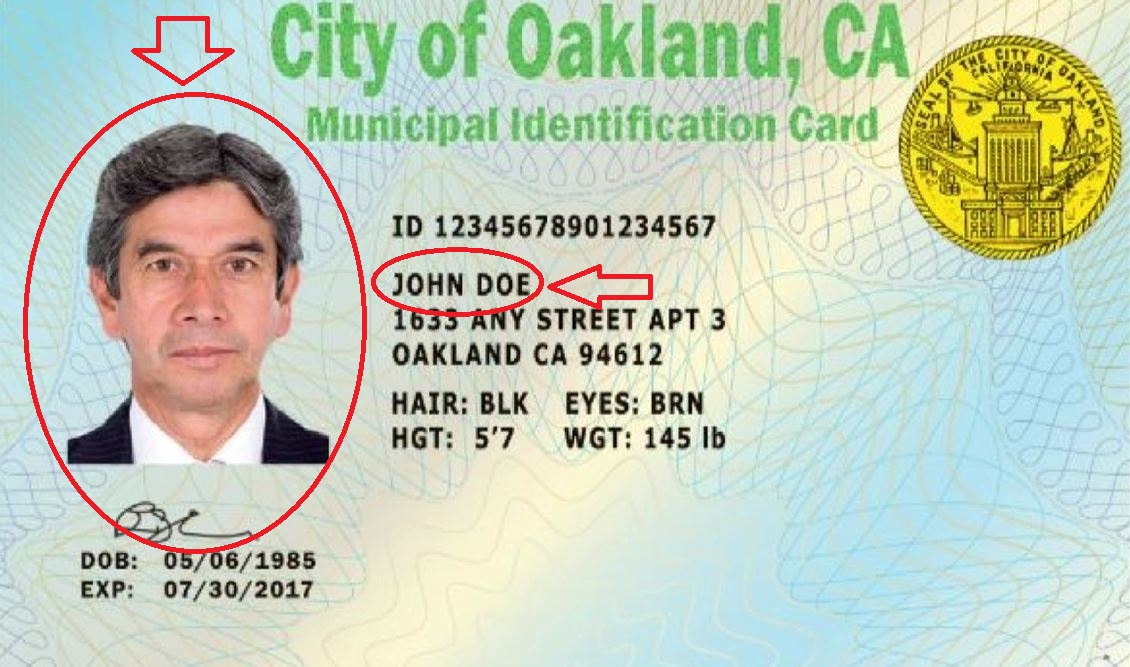
Before you proceed, you should keep one thing in mind namely, the way you will "call" the file that you will upload.
Before uploading it, you should rename it as follows:
username_ID.jpg
Username: is your unique identifier
ID: is the general term that is used so as to let the administrator know that you are uploading and ID and that you have initiated the verification process.
.jpg : is the file extension ( max. file size: 200 KB).
Thus, assuming that your unique username is Gandalf, this is how your file should be renamed before uploading it:
Gandalf_ID.jpg
Next, click the Become Verified Button.
A confirmation appears and with it your authentication badge appears next to your name as well.
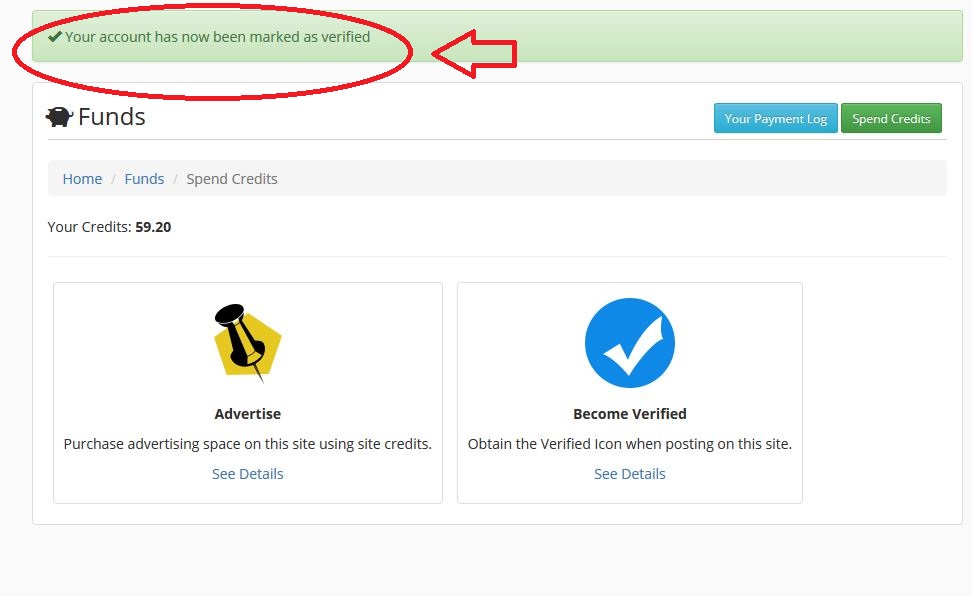

In regards to your part, you are done.
It is left now to the administrator to review your ID and to accept your verification (which usually is the case).
Nevertheless, in the extreme case that the administrator will reject the application for your verification; you will see that the badge will disappear from your name. If this is the case, you can directly contact the administrator (through PM) and ask why it has been rejected.
Questions and Answers
Who sees my ID?
The Administrator is the only one that reviews these documents and no other.
Will my personal data be sold to any third parties?
Absolutely NO! It is an official document of yours and under no circumstances will it be given to any third party!
Is anyone else seeing my personal ID etc?
NO.
What will happen with my ID?
Your ID will be stored in our servers and practically we will forget its existence.
Why is it being stored instead of being deleted afterwards?
Here is why: In case that someone else will ever come along and suggest that he/she is the person that you did claim of being; then, the administrator will a) review both documents (aka, the official documents that have been provided), b) the administrator will contact both of you and check who the fake one and who the real one is and c) legal measures may be followed against the fake one.
Moreover, the fake one will be banned instantly and permanently.
If the administrator cannot deduct who the real one is then legal actions will be taking place due to identity theft by the fake one.
How long will it take for the Administrator to review my ID?
Since the admin is the only one reviewing these official documents the timespan can extend from a couple of hours to a few days.
Finally, why do you have to spend 5 credits for the authentication process?
Because of the following facts:
time consuming to cross-reference your ID,
takes storage space in our servers
possible future costs that may arise for protecting your ID from fakes
and the list goes on and on...
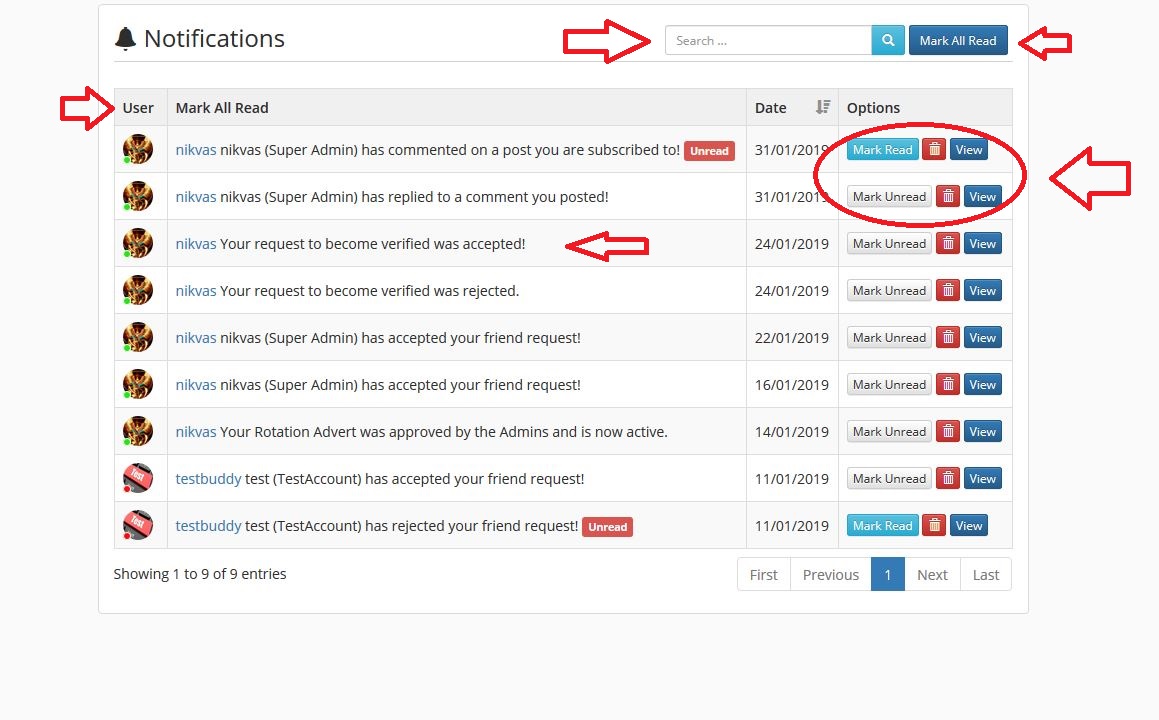
The Notification Panel
Another tool that you are provided with is the Notification Panel.
If you want to view all your notifications and actively decide what to do with them you can do so.
First, click on the bell-icon and then on Read More.
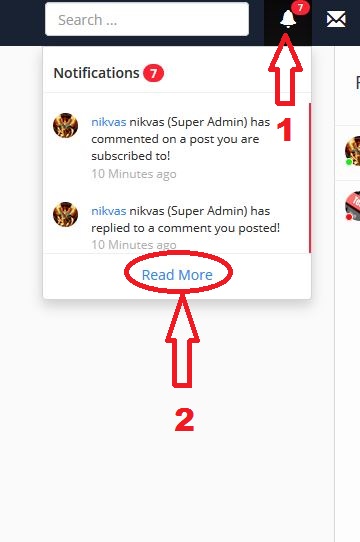
Next, the Notification Panel opens up for you in which you can: search for notifications, see the date when the notification was issued, see the user from which the notification came from, read the notifications and perform various other tasks.
Change the Language
If you so desire you can also switch between languages and choose which language best meets your needs.
Before we show you how to do it, there are a few things that we would like to point out.
Currently, the supported languages are English and Greek. In the future we will add more languages.
(Looking for translators): If you would like to support the team, you can PM directly the Administrator and become part of the translators-group. For example, if you feel comfortable with the German language you can support us in translating everything to German. Obviously, all credits will go to you.
That being said, let us illustrate how you can switch between languages in the social media platform.
The Process
Regardless where you are, go to the lower left corner of the page. There you will find an indication stating "Change Language".

Next, the main Language Panel will open for you.
Click on the dropdown list so as to open the language list.
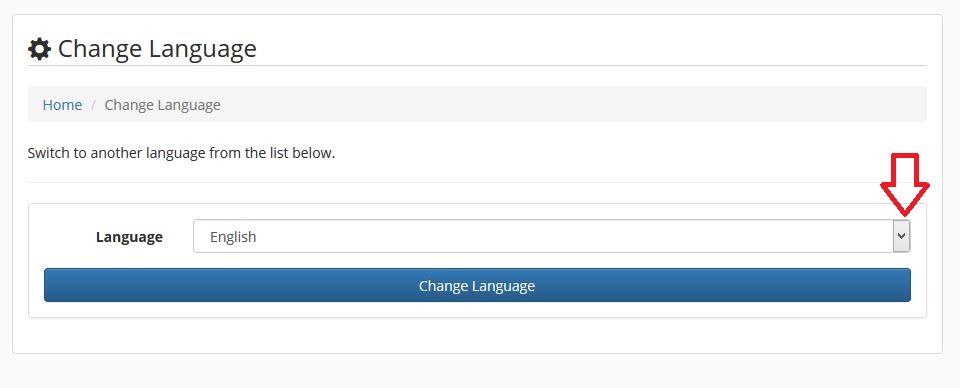
Choose the language that you desire and click the Change Language button.
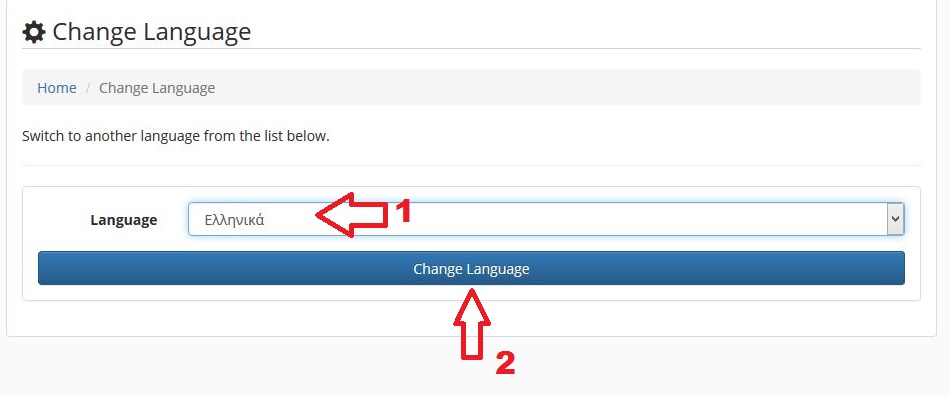
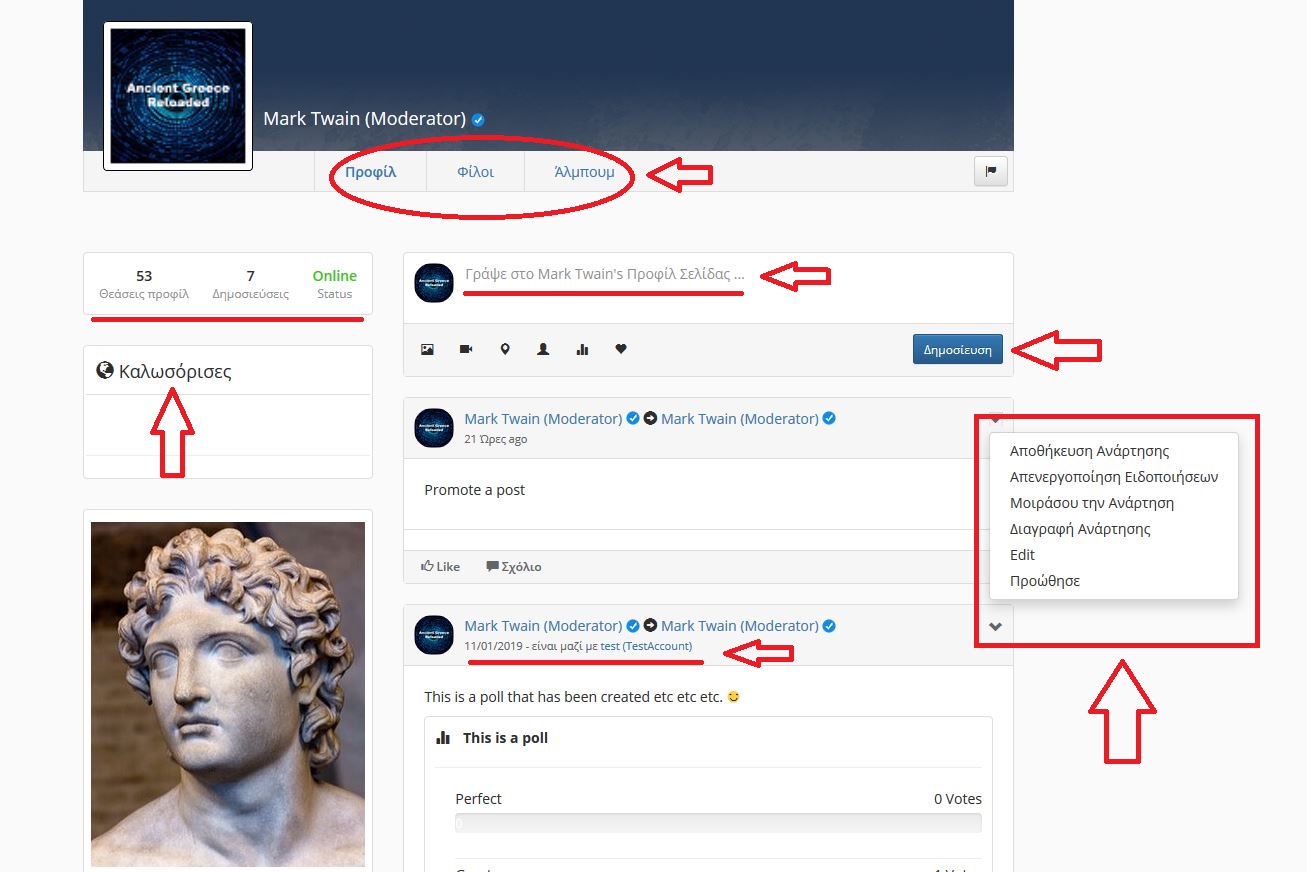
Once completed, everything will change to your desired language. Below is an example of it.
Names solely reserved for the Team
Names such as Administrator, Global Moderator, Moderator etc. are solely reserved for the team that is responsible for running the social media platform.
You will recognize the team members because besides their names they will also have one of the aforementioned "titles" as well as the authenticity badge (aka, they will be Verified).
Anyone who is not a member of the team and will make use of these titles will be immediately, and permanently, banned from the platform.
Newsletter
In contrast to almost everyone out there, we use our newsletter in a completely different way.
We do not spam, we do not bombard you with emails, we barely promote anything and so forth.
As a matter of fact, we ONLY send out a newsletter only if there is a really special offer available or if we have something of value to say to our friends that have subscribed for our newsletter.
That being said… originally, we had three points from where people could subscribe to our newsletter (our website, our forum and our online store). Consequently, so as to keep everything tight we currently utilize only one section from where you can subscribe to our newsletter.
Click on the link below:
Newsletter for Ancient Greece
Go to the Lower Right Corner where you will find the Newsletter section.
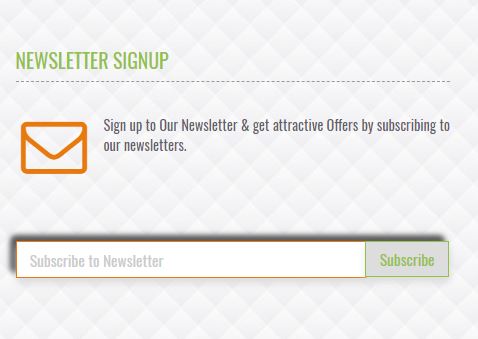
Enter your email address and click on the Subscribe button.
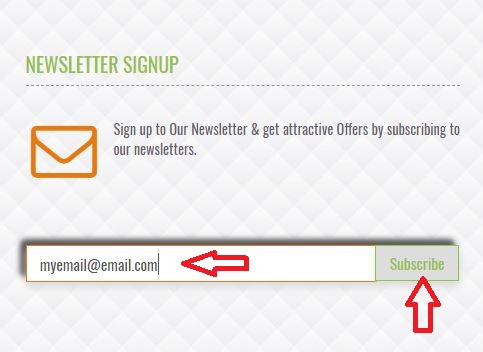
Congratulations, you are done!
Deleting your Account
Let us go with the assumption that for some reason you have decided to delete your account.
In our social media platform, the entire process is straight forward, easy and fast.
Please be advised: Before you proceed in deleting your account be 100% sure that you do want to delete your account.
The reason: Once you delete your account everything gets wiped out from our database and there is no way to recover anything. Meaning that once you delete your account you cannot retrieve anything and all of your posts, comments and hard work will be gone permanently.
Thus, if you decide to delete your account be certain that this is what you want!
The Process
Go to your Settings.
In there you will find an option called: Delete Profile
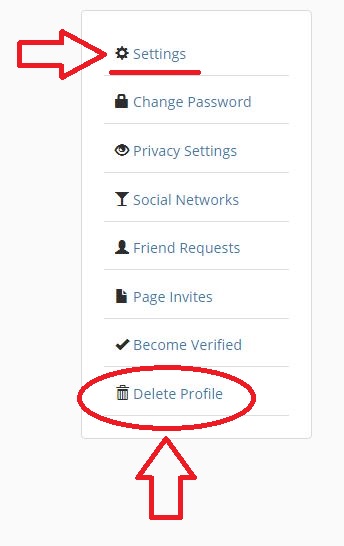
Click on that option.
Once you click OK... that’s it!
Your account has been deleted – the end!
Read Also
Main Links of Ancient Greece Reloaded
Index - Explore More


Donate and Support Us
Support Ancient Greece Reloaded
by clicking on the button below:
Thank you for your support!
Become a Patron
Support Ancient Greece Reloaded
by clicking on the button below:
Patron
Thank you for your patronage!
More Categories to Explore
-

Legendary Heroes
-

Legendary Monsters
-

Heroes vs Monsters
-

Legendary Love Stories
-

Famous Kings and Queens
-

Atlantis vs Athens